African Bowhunting
the theory and the practice
Compiled by Harry Marx
6thEdition
Revision 2015/06/01
This book is a comprehensive look at the theory of bowhunting,
and how it affects the practice thereof.
It is also used by the South African Bowhunter's Association for its
Bowhunter Proficiency Certification (BProC) program.
In this introduction to bowhunting the focus is on the theory, practice, reasons and larger picture for the curriculum. |
This project has now been running since 2009, and now we are presenting the 6th edition.
In the 3rd, the major change moved away from categorising animals and define requirements in relation to animal weight directly.
In the 4th we made changes and simplified the assessment of required penetration.
In the 5th, we revisited this theory, and made an incredible break through. Assessing required power is now based on three simple graphs. We also define a new unit for this, which works much easier.
In the 6th edition we revised the whole book, and added e few subjects.
|
1 Foreword
|
2 Introduction
|
 A note on conventions: All the text that is marked like this, is considered important / summative to bowhunting. The rest is concidered "supportive".
2.1 Why Bowhunt?
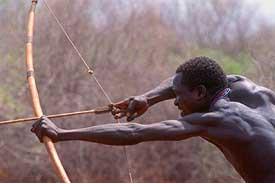
Bowhunting can be easy, or very difficult, as you choose. Sitting in a hide, you only need to have lots of patience. Hunting by "walking and stalking", with a bow however, can be very challenging. You need to get very close to the animal, and then draw the bow, and shoot, without being seen. |
2.2 Is "minimum requirements" for hunting sensible?
Before we can discuss the theory of penetration, we need to make a judgment call on a more fundamental issue - when do we consider penetration as "enough"? In other words, when do we consider an arrow that hit its target, as lethal? This sounds rather strange, since we all know exactly when an animal is dead or not. The question we are posing is of a slightly different nature. Yes, we know whether a particular animal is dead, but we need to determine when it would have died, before we make the shot! Hindsight is not allowed. |
Clearly, there are people that survive even severe overdoses. Likewise in hunting, we would like to apply an arrow that in "most" cases, results in a quick kill. |
3 In Theory
3.1 Penetration Ability
|
| Further Reading: Koert Pretorius, AB, Nov/Dec 2000, p19, "Jumping the string" |
|
|
|
Bradly Hunt from Alkali International, published an article on AmmoGuide.COM called A New Concept in Deep Penetration of Solid Rifle Bullets in Large Animals. He describes a penetration index used in the big game hunting community where PA equals the square root of Kinetic Energy X Sectional Density / Frontal Area.
In an effort to quantify all these measurements on the broadhead, Dr. Ashby suggests the use of a tissue penetration index ( TPI = length/(BladeCount x Cutting diameter/2) ). This index captures most of the listed attributes, but excludes the effect of the general size of the hunting point (see next table). It also fails to provide for modern multi-blade hunting points with so called "bleeder blades." |
|
|
|
|
|
|
| Further Reading: Cleve Cheney, AB, Jan/Feb 2001, p24, "Arrow penetration - Is there more to it than kinetic energy and momentum?" |
3.1.1 Penetration Index - A new formula
|
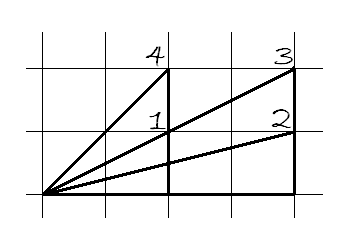
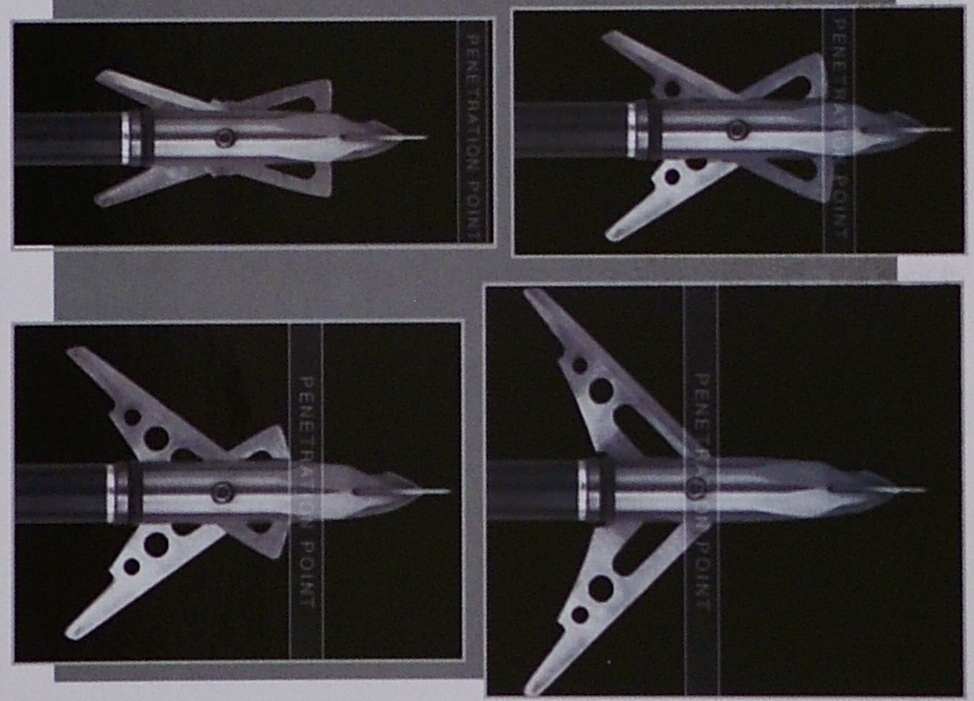
Changing blades profile from #1 to #2, you would expect the force needed to cut flesh to be half as much, from #1 to #3, it should double, and from #3 to #4 it should also about double (or be about 4x that of #1). Using the relationship of H.tan(A/2), which is the same as H2/(L+x), where x is the length of the blade along the shaft, we can see this pattern, except for #4, which results in just more than 3.5x the force needed than for #1. For our purposes it will suffice. |
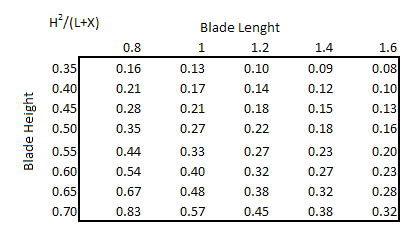
If you look at the table above (made with the tan(A/2) principle), you will see that increasing the blade length (changing from blade #1 to blade #2 as in the above picture), reduces the force needed to cut (going right on any row). I.e. double the blade length, and the force needed is halved. |
Blades CD L CD(mm) L(mm) H(mm) TPI H2/(L+x) The first 3 rows increase the cutting diameter. The new factor is slightly more critical of cutting diameter than TPI. 2 1 1 25.4 25.4 8.9 1.00 1.00 2 1.25 1 31.75 25.4 12.1 0.80 0.71 2 1.5 1 38.1 25.4 15.2 0.67 0.54 |
|

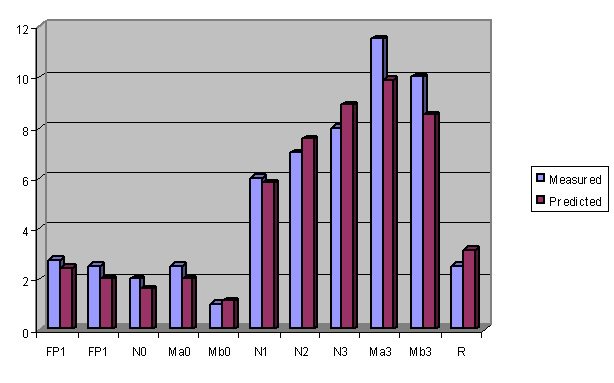
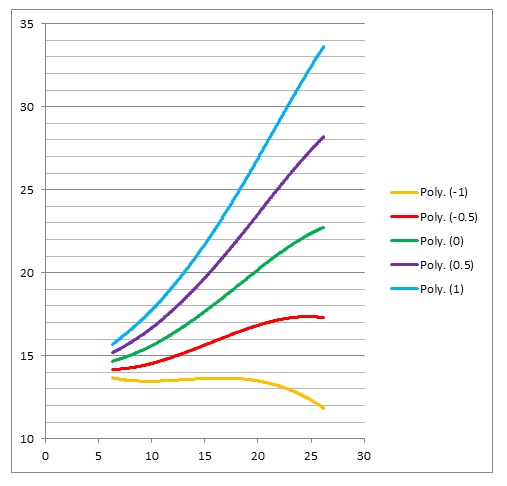
This equation predicts how much resistance a broadhead of a particular design will experience when pushed through muscle tissue very slowly. The graph on the left is of predictions compared to actual measurements. This was for 2 different fieldpoints, a Nitron with no blades, a chisel point mechanical with no blades, a cut-on-contact mechanical with no blades, a Nitron with 1,2 and 3 blades, the mechanical with chisel tip and 3 blades, the c-o-c mechanic with its blades, and lastly a Razor Back: a two (fixed) bladed c-o-c broadhead. |
|
Here is the function developed in vbScript for among other applications, MicroSoft Excel: |
Function PDepth( _
    ByVal Ro As Double, _
    ByVal m As Double, _
    ByVal v As Double, _
    ByVal dia As Double, _
    ByVal a As Double, _
    ByVal ds As Double, _
    ByVal c1 As Double, _
    ByVal c2 As Double, _
    ByVal c3 As Double, _
    ByVal KELoss1 As Double, _
    ByVal BodyDepth As Double, _
    ByVal KELoss2 As Double)

    Dim s As Double, d As Double, PI As Double, KE As Double, vv As Double
    PDepth = "err"
    PI = 3.141592654

    s = 0 'initialize distance penetrated
    If Ro < 2 Then Exit Function 'too little Ro, model will crash
    If ds <= 0 Then ds = 0.001 '1 mm steps

    'limits the minimum speed to about 140 fps
    v = v - ((c1 / v) ^ c2 - 1)
    If v < 0 Then Exit Function

    'SI units
    Ro = Ro / 2.2 * 9.8 'lbs to Newton
    m = m * 0.065 / 1000 'grains to kilogram
    v = v * 12 * 2.54 / 100 'fps to meter per second
    dia = PI * dia * 2.54 / 100 'shaft dia in inches to shaft area in
                                 'meter squared per meter shaft
    a = a / 1550.0031 'inches squared to meter squared
    BodyDepth = BodyDepth * 2.54 / 100 'inches to m
    KELoss1 = KELoss1 * 1.359431604   'foot pounds to J
    KELoss2 = KELoss2 * 1.359431604   'foot pounds to J

    If KELoss1 > 0 Then 'modeling bone penetration as loss of energy
    ' this is valid as penetration into bone is related to KE
        KE = m * v ^ 2 / 2
        KE = KE - KELoss1
        If KE < 0 Then Exit Function  'if we don't get through the bone - done
        v = (KE * 2 / m) ^ 0.5 'get the speed exiting at back of bone
    End If

    vv = v ^ 2  'meter per second squared - we will loop using vv
    s = 0
    Dim aa As Double
    Do While vv > 1 And s < 10
        If s > BodyDepth + 0.75 Then       '  [       ]  ------------->
            Ro = 0
            a = 0
            aa = 0
            PDepth = 999
            Exit Function
        ElseIf s > BodyDepth And s > 0.75 Then  '  [   ----]------->
            aa = (0.75 - (s - BodyDepth)) * dia
            a = 0
            Ro = 0
        ElseIf s > BodyDepth Then           '    --[-------]--->
            aa = BodyDepth * dia
            a = 0
            Ro = 0
            If KELoss2 > 0 Then  ''exit rib breakage energy loss
                KE = m * vv / 2 - KELoss2
                'if we don't get through the bone, done
                If KE < 0 Then exit do     '    --[-------]
                vv = (KE * 2 / m)
                KELoss2 = 0
            End If
        ElseIf s > 0.75 Then           '    [  ------------>       ]
            aa = 0.75 * dia
        Else                        ' ------[----> ]
            aa = s * dia
        End If
        d = (Ro + (Ro * a + aa) * vv) / m
        vv = vv - 2 * d * ds
        s = s + ds
    Loop
    If s >= 10 Then
        PDepth = 999
    Else
        PDepth = s * 100 / 2.54 'and return the result in inches
    End If
End Function
|
A similar model was previously used by the author to predict the trajectory of an arrow through the air, based on this same friction principle. The friction (Fr) the arrow experiences at various speeds changes, so it also changes as the arrow decelerates during penetration. This model involved simulating the arrow�s path in small steps, and to calculate the friction at each step. But it requires a "friction constant" (k). For the trajectory we could calculate k using two measurements, at 1Y and 20Y, and adjusting k until it predicted the same speeds as measured. |
Speed loss for breaking rib on entry: (20 foot-pounds loss)
        300   500   700
  200  -100   -52   -35   As you can see, slower and lighter
  225   -81   -44   -31   arrows looses more speed breaking
  250   -70   -39   -27   ribs than faster and heaver ones.
  275   -61   -35   -24
  300   -55   -32   -22
|
For the purpose to standardize energy loss and penetration, we propose the kinetic energy loss (foot ponds) be calculated as the animals weight (in kg) raised to the power of 0.28, multiplied with 6.24.
This is not magic numbers, but rather an aggreement. |
Approximation of energy needed to break a rib per animal mass:
     Animal    energy
     weight    needed
         10      12
         50      19
        220      29
       1060      45
       5000      70
|
Another interesting prediction we see is: when we take two arrows, weighting 900gr @ 200fps and 300gr @ 345 fps (both have kinetic energy 80 ft.lbs) and say both break a 25 footpound rib on entry, the 900gr arrow looses 18% of its penetration, and the 300gr arrow only 13.4%. However, the 900gr arrow still out penetrates the 300gr one by more than 50%. |
But we are now loosing focus and are trying to define penetration in terms of the target being hit, and not the broadhead. Although this is the reality of hunting, the heterogeneity and all variables of a live animal being penetrated by an arrow, is totally impossible to predict. Instead we limit ourselves to muscle tissue, and the effect of a single rib on entry and exit. In other words, we standardize the animal. |
Warning: Although tests like these try to prove heavier arrows have more penetration, they rather reflect that the bow is slightly more efficient at higher arrow weights. The medium is not comparable to wet tissue, but is indicative of penetration into bone. |
| Further Reading: Cleve Cheney, AB&A, Apr 2007, p27, "What is TPI?" |
3.1.2 A Case Study on Friction
According to tribology (the scientific study of friction):
|
Animals consist of a mixture of solids (bone), elastics (hide, sinew, muscle) and liquids (water and oils). Fats are "oil-lubricated solids". So perhaps it�s best if we look at lubricated hard surfaces and fluids. So for liquids, to the best approximation, the arrow feels friction relative to its speed squared. |
Now, lets look at all the attributes of these arrows closely:
            gr   Dia.    Spine   gpi   FOC  Fc%  fps  KE  cP
Gold Tip    370  0.295   400     8.5   11   44   192  70  48
Easton      422  0.294   340     10.5  9.6  53   277  72  52
CarbExp     458  0.315   350     11.8  8.9  52   268  73  55
|
Fc% is the critical loading weight of the arrow as a percentage of the bow�s draw weight, and is an indication of dynamic spine - values between 38% and 45% is generally good (45 being the stiffest). (The definition of these attributes is discussed later in full detail.) KE is kinetic energy and cP is the momentum x100. So how can we explain the above anomaly, where both KE and cP is largest for the Carbon Express arrow, but it penetrated the least? |
Have a look at these values:
            Dia     cP  Frontal Area   cP density
Gold Tip    0.295   48         0.068   7.022
Easton      0.294   52         0.068   7.651
CarbExp     0.315   55         0.078   6.996
|
If we now look at the cP density, it explains why the Easton did the best. If we took the FOC and dynamic spine into account, it also explains why the GoldTip did 2nd best. But, these experiments were done in a cardboard box butt. What effect would this have had? |
The tribologists would be tempted to say that since the friction area�s were dry, the pressure on the bigger shafts was more and faster speeds had slightly less friction, and so the Easton won. They would also claim that if hunters shoot at flesh, friction is independent of surface pressure, but goes up with speed squared. So in flesh, the Carbon Express would have won. |
3.1.3 Front of Center
Other factors influencing penetration of projectiles are sectional density and the centre of gravity of the arrow (FOC). Sectional density is the mass of an object divided with it frontal surface area. Sectional density does play a major role in arrow penetration, since the difference in arrow shaft weight. However, the differences in diameter are usually very small. However, new technology are decreasing arrow diameter, and this will need to be revised. |
|
Where it plays a role in penetration is easiest to picture if an arrow is imagined that hits a target slightly at an angle. Such an arrow's momentum, acting through its centre of gravity, will push the point sideways and greatly reduce penetration. For this reason a higher FOC makes the bowhunter's set-up more forgiving for a slightly less than perfect arrow flight. This is in fact the same reason an immediate unease was felt about using a spear to hunt an elephant, as described elsewhere. |
|
|
|
|
|
We can provide an empirical formula for his results, and it looks like this:
If you are wondering what an arrow's FOC will be, but have not yet built it, you can use the following equation to calculate it:  where Wt is the total arrow weight, Wi is the weight of each component, L is the length of the arrow, and Li is the distance of the component's center of gravity from the nock point. |
| Further Reading: Seppie Celliers, AB&A, Apr 2008, p30, "FOC - Front of centre balance" JP de Villiers, AB&A, Feb 2008, p58, "FAQ's" Dave Holt, AB, Nov/Dec 2000, p7, "Arrows - Heavy versus light" Dave Holt, AB, Mar/Apr 2001, p9, "The Downrange decay of Arrow Velocity" Herman Brand, AB&A, Dec 2007, p51, "Swaar of Ligte Jagpyle?" |
3.1.4 Shaft Diameter
The shaft of the arrow experiences friction during penetration, and as such affects it. Experimental results have shown that an additional factor can be multiplied with the achieved velocity or momentum, to accommodate this influence. This shaft factor is based on whether the shaft of the arrow is the same size or larger than the hunting point's ferrule's diameter. If the arrow's shaft is the same size, a shaft factor of 0.9 should be used, while if the arrow shaft is larger, a value of 0.6 should be used (if smaller 1.0). |
3.1.5 Shaft Tilt
The model we are trying to develop has at its hart defining penetration in terms of the arrow's attributes. But some of these attributes are not independent of the target, for example the Ro defined elsewhere, which is a function of the blade design and the type of material being penetrated. As such, we had to standardize on some sensible medium. In looking at the effect of arrow tilt, we are delving into even harder ground. |
Wp x Lf + Wgpi x Lf x Lf/2 + Wgpi x Lb x Lb/2 + 40 x (Lb - 3) |
where Lf is the length of the shaft in front of the COG, |
The deeper the arrow penetrates the more of the shaft is in contact with the target. This means the tilting increases as the arrow penetrates and the influence of the tilting increases. Another big problem with trying to quantify this effect is that the size of the force that does the tilting, is dependent on the medium shot into. So we sit with an initial tilt caused by wind (a variable independent of arrow design), and the force (a second independent variable), while we are trying to define a model based on only the arrow. |
3.1.6 Putting it all together
Either one starts by measuring the penetration resistance (Ro) (the easiest but the least precise), or one measures the dimensions of the broadhead, and calculate it using the formula for Ro (more complicated, but a bit more precise). |
    Mass    Body width
    (kg)    (inches)
      10         4
     100        12
     220        17
     800        31
    5000        74
|
Now if you think the model is complicated, the mathematics actually simplifies to where more than 95% of the model can explained by: |
                    weight x speed
     Penetration = ------------------
                      760 x Ro0.8
|
Penetration Graph: |
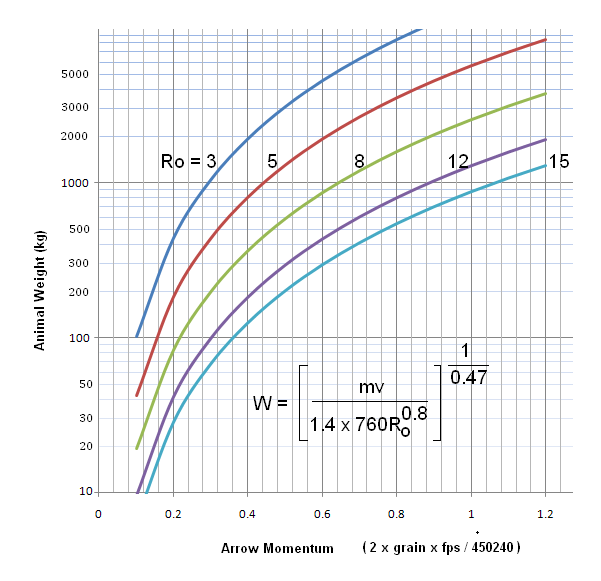
In this graph we have for different resistance values, the approximate momentum required for a full body penetration, not hitting any bones. |
Remember, we are not really concerned with the width of the channel here, since it was agreed that all broadhead wound channels exceeds the 7.5mm proven to be fatal within 10 seconds. |
3.1.7 Required Penetration Depth
On http://www.bowhunting.co.za/SABA/asp/minreq.asp, the whole model is implimented.
On it you can select the broadhead that closest represents your broadhead, and the web page will show
you what the required kinetic energy, momentum or speed is, for the particular animal and arrow weight. |

The final product is one where you can with a single selection of the broadhead determine the suggested minimum requirements for all arrow weights, and all animals. The answer is then presented in a simple lookup table. Of course there are always incidental factors that will cause deviations, and some animals bend the rule. The fine print therefore reads that "your experience may vary" simply because the average bowhunter is looking at a relative few hunts per year. Indeed, the variability of penetration cannot be wished away. And of course, the result is not precise. You simply cannot measure any of the parameters with precision, and the result cannot be precise. We suggest you expect about a 10% error, for ex. if a value of 53 foot-pounds are calculated, you can assume it is accurate to about �5 foot-pounds (=53/10). The only counter we suggest to incidental factors and imprecision is "overkill' - literary.
|
3.1.8 New development - easier to understand graphs
As things are, things change. This sounds like zen, but unfortunately, true. As part of defining the Norms and Standards for hunting in South Africa, the goverment asked us a 2nd time for input in this regard. It was then that we realized that we will first have to do more mathematics, in order for the hunter to do even less... |
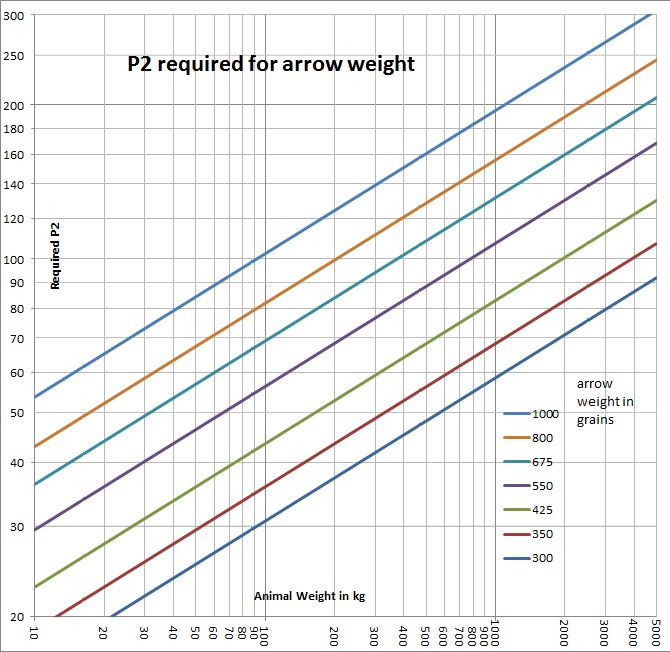
Indeed, this formula is MUCH more interesting, firstly because it defines minimum requirements as the sum of two factors. The 1st factor relates only the broadhead's design to the animal's weight, and the 2nd factor relates only the arrow's weight to the animal's weight. In affect we are able herewith to define the influence of the broadhead independently of the arrow weight, with the provision we work in required momentum squared (P2). |
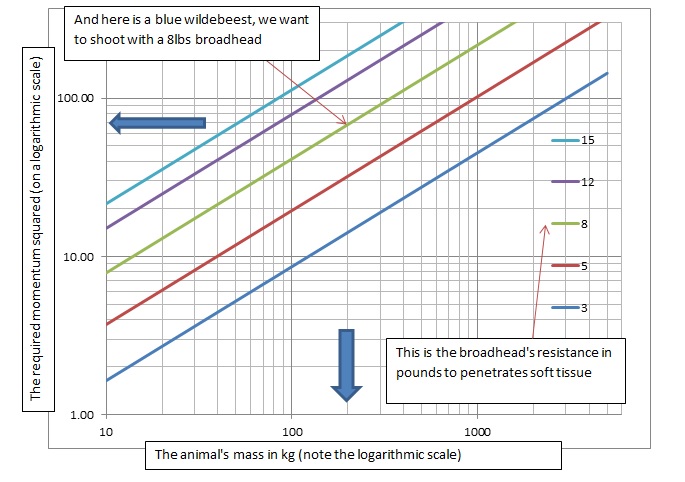
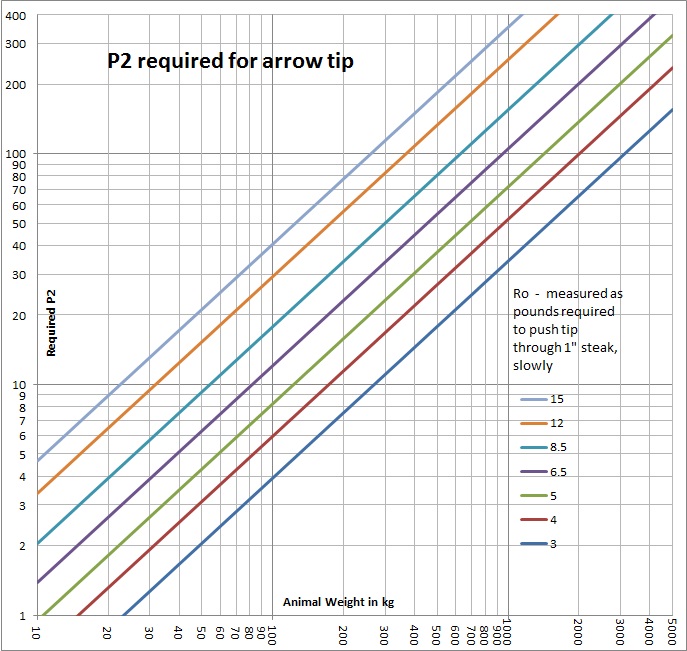
Relating broad head design to animal weight.
Relating the broadhead's cutting resistance to animal weight. Please note that the values on the axis, is not linear, they are so called logarithmic. Therefore the markers indicate 10, 20, 30 up to 100kg, then 100, 200, 300 up to 1000kg.
|
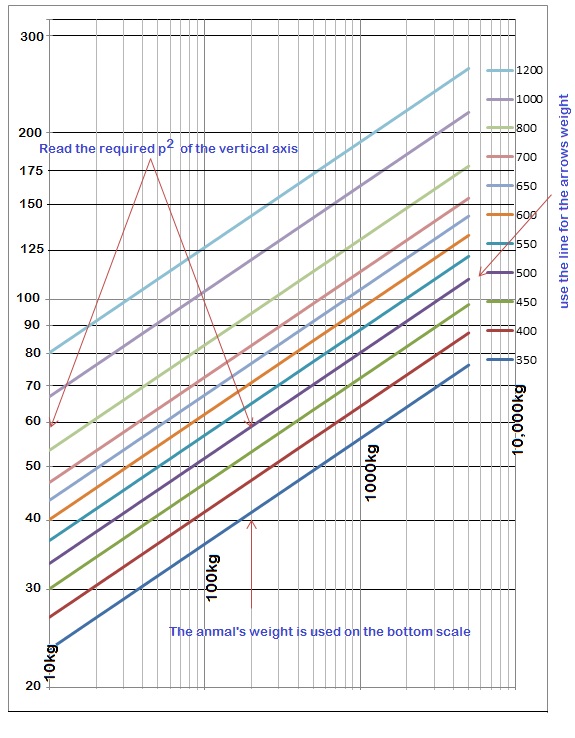
Relating arrow's weight to animal weight.
|
Does it make sense?
|
Graph 1. P2 required in relation to arrow tip:
Graph 2. P2 required in relation to arrow weight:
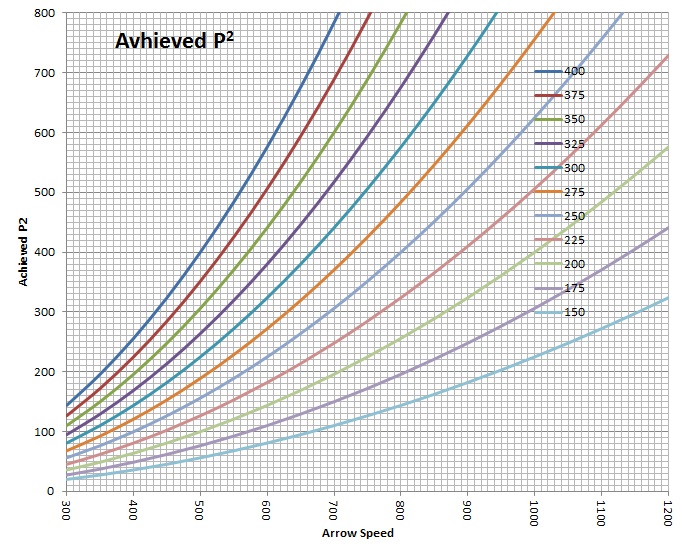
Graph 3. P2 achieved by arrow:
3.1.9 Checking your bow's performance
The next three tables allow you to do all we discussed in this book so far, in three simple steps. Of course you need to know the arrow's weight (in grains), how fast your bow shoots it (in fps), the intended hunting tip's resistance to penetration (in pounds), and the weight of the animal you intend to hunt (in kg). |
3.1.10 The Proof - testing the model
Using these tables in the previous section, we investigated a NAP Nitron with three fixed blades, needing around 8 pounds of force pushing it to penetrate into rump muscle. If you have arrows weighing 700 grains, and you want to hunt blue wildebeest (which tops out at around 200 kg), the new model suggest you need at least 120 sqr.slugs, or 40 foot-pounds. Note, this being here the minimum requirement.
|
| Further Reading: Herman Brand, AB&A, Mar 2007, p30, "Die pyl in pyl en boog" Seppie Celliers, AB&A, Dec 2007, p56, "Pyle maak 'n groot verskil" |

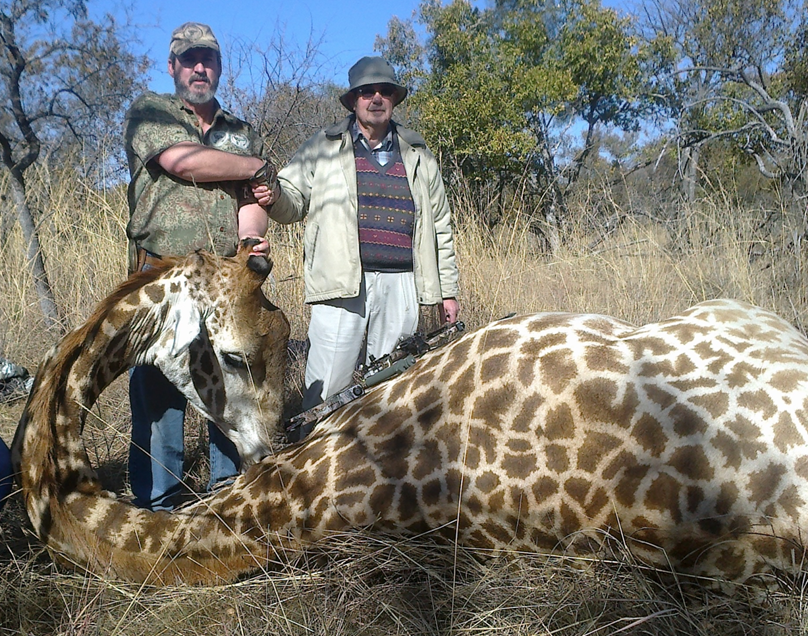
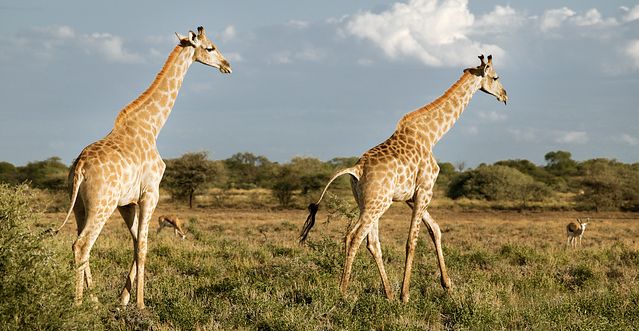
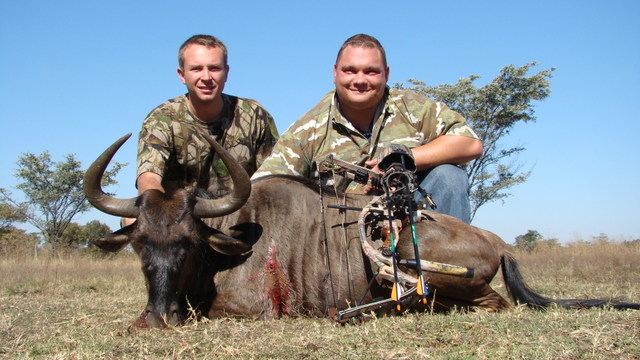
The author(left) with his giraffe... |
3.2 Bow Efficiency
Bow efficiency is the ratio of the arrow's kinetic energy, to the energy used to pull the bow. To determine the energy used to pull the bow, you need a bow-scale. With this you can draw what's called the draw-force curve. It is basically how hard you need to draw the bow, at each particular point in the draw. So what you do is to measure the draw force for the bow at every inch as you draw it. The sum of all these measurements is the draw energy in inch-pounds, which when divided with 12, gives foot-pounds. |
The best way in which to compare bows in relation to efficiency, using this last equation, is to calculate the speed that the bows would shoot the particular arrow you plan to hunt with. The bow which attain the highest speed would of course be the most efficient. By the way, I am assuming these bows are all of the same poundage, and draw length. |
| Further Reading: Harry Marx, AB&A, Nov 2008, p30, "Comparing Bows with bows: virtual mass" Herman Brand, AB&A, Nov 2006, pi, "Beste Boog?" Dieter Noli, AB&A, Nov 2006, p59, "Bow evaluation methods" Rean Steenkamp, AB&A, Jun 2006, p43, "Who says a longbow isn't good enough?" |
3.3 Bleeding and Penetration
Finally, we are getting closer to the actual hunt... |

|
As bleeding rate is sometimes likened to the result of the surface area of the cut, it would seem logical to use as many as possible blades. However, it is not flesh that bleeds, but arteries. And no matter how many times you cut an artery, it bleeds just as fast as if it was cut once. So arguments and opinions abound - we will look at the facts. |
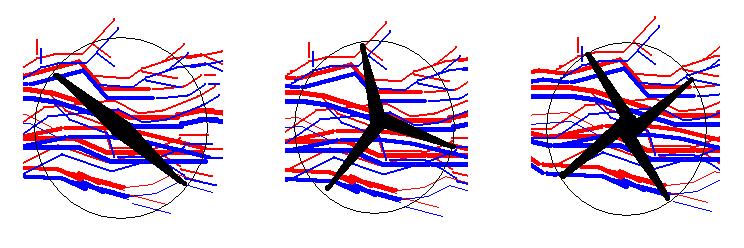
If you draw a circle with the same diameter as the broadhead's cutting diameter, and in it the cuts made by the broadhead, you can easily see that with 2 bladed broadheads, you can draw many lines representing arteries through the circle that does not get cut. When you do this with a 3 bladed broadhead, the chance of an artery being cut by any blade drastically increases. |
|
For 4 blades the penetration depth would be: |
    D0   20"
    D2   (penetration)       ACA (average cutting area)
    inches                     square inches
    2x      3x     4x        2x     3x     4x
    10      8.0     6.7        6.3     6.6     6.0
    11      9.0     7.6        6.9     7.5     6.8
    12     10.0     8.6        7.6     8.3     7.7
    13     11.1     9.6        8.2     9.2     8.7
    14     12.2    10.8        8.8    10.1     9.7
    15     13.3    12.0        9.5    11.1    10.8
    16     14.5    13.3       10.1    12.1    12.0
    17     15.8    14.8       10.7    13.1    13.3
    18     17.1    16.4       11.3    14.2    14.7
    19     18.5    18.1       12.0    15.4    16.3
|
In this table we can see that for example in row 3, if a field point penetrates 20", and a 2 blader 12", then a 3 blader will penetrate 10", and 4x only 8.6". Their cutting areas will be 7.6sq", 8.3sq", and 7.7sq". |
|
|
Which is basically common sense isn't it?
|
| Further Reading: Herman Brand, AB&A, May 2007, p32, "Minder Bloed" |
3.4 Shooting Distances
3.4.1 ...based on Reaction Time
In the past speed was one of the most important factors of a bow as promoted by industry. This of course makes sense if you are selling bows. The IBO standard (being misused as it is) set a constant arrow weight, and allows the buyer to make a rudimentary/superficial comparison between bows. More importantly, it allowed manufactures to advertise "mine�s bigger than yours". The standard could have been defined differently - what is the heaviest arrow the bow will shoot at 200 fps? This (although totally impractical) would have instead led to a weight race... |
|
Shooting high (+) and low(-), for animals at various distances,
for different arrow speeds, that comes closer 1Y after ranging,
for elevations relative to anchor point +1 to -5Y.
    50Y          40Y          30Y          20Y           10Y
150 4.0 to 3.1   3.4 to 2.9   2.6 to 1.9   1.8 to  0.9   1.1 to  0.0
175 3.1 to 2.7   2.5 to 2.0   1.9 to 1.3   1.4 to  0.4   0.9 to -0.3
200 2.4 to 2.0   1.9 to 1.4   1.5 to 0.8   1.1 to  0.2   0.8 to -0.4
225 1.9 to 1.5   1.6 to 1.0   1.2 to 0.5   0.9 to  0.0   0.7 to -0.5
250 1.6 to 1.1   1.3 to 0.8   1.0 to 0.3   0.8 to -0.2   0.6 to -0.6
275 1.3 to 0.9   1.1 to 0.6   0.9 to 0.2   0.7 to -0.3   0.6 to -0.7
300 1.1 to 0.7   0.9 to 0.4   0.7 to 0.1   0.6 to -0.4   0.6 to -0.7
|
|
|
If you take a video recording of an animal being shot with a standard video camera, the frames or still photos it takes, is about 25 per second. This means the frames are 0.04 seconds (40 milliseconds) apart from each other. |
|
If you shoot at an impala at 20Y, with an arrow at 250 fps, the animal has 187 milliseconds to react between the sound reaching it, and the arrow doing so. If you wish to reach the animal before 100 milliseconds, you will have to shoot at 395fps. |
|
Here we see the time (milliseconds) between the sound and arrow reaching the target, the distance the animal can "fall" during string jumping (reacting only after 100ms), and the speed at which it would be falling by this time. Clearly you can see the need for 275+ fps at 30Y and 200+ fps at 20Y, to minimize string jumping. |
    Time (milliseconds)     Distance (inches)       Speed (fps)
     50  40  30  20  10     50  40  30  20  10      50  40  30  20  10
150 868 694 521 347 174    114  68  34  12   1      25  19  14   8   3
175 725 580 435 290 145     75  44  22   7   0      20  15  11   6   2
200 618 494 371 247 124     52  30  14   4   0      18  13   7   5   1
225 535 428 321 214 107     37  21   9   3   0      14  10   7   4   0
250 468 374 281 187  94     26  15   6   2   0      12   9   6   3   0
275 413 331 248 165  83     19  10   4   1   0      10   7   5   2   0
300 368 294 221 147  74     14   7   3   0   0       9   6   4   3   0
|
|
|
Another ground for differentiating between for example a spear and an arrow, is the speed of the projectile. The influence of the speed of the projectile on accuracy will be discussed in the following paragraphs. Its influence on penetration is however also critical for a totally different reason than momentum. It ties in with FOC as discussed above. |
|
The importance of a moving target on the penetration of a slow projectile is easily imagined as the moving animal will cause the projectile to slant during impact. This will decrease penetration in exactly the same way as an imperfect trajectory due to a too low FOC. Again, we will only capture this effect as a general guideline, since currently it does not seem sensible to try and quantify it other than as arrow speed. |
|
|
In turn, defining suggested maximum ranges for all categories of bowhunters is also of ethical importance. This ties in perfectly with accuracy as discussed above. The temptation is all too great for trying to suggest a measurement of an archer's accuracy, and therewith provide suggested maximum hunting distances. The reality is however that even if a hunter could accurately hit the target animal's vitals at 80Y, the time for the arrow to reach the animal will be relatively long, and thereby its movement during this time ("string jump") will negate all the care that went into the perfect shot placement. It is generally accepted by bowhunters that about 20Y is the maximum range for small game (and definitely for warthogs as well) at arrow speeds of about 250fps. Larger game are generally slower to move, and 30Y is quite acceptable for the large antelopes. For Giraffe and buffalo, 40Y is not unrealistic. The maximum suggested hunting distance is not a function of the hunter's accuracy, but indeed of the animal's reaction time (and size of vital organs) vs. the speed of the arrow. |
|
  Proposed Maximum Yardage based on Reaction Time
   Size (kg)     25      50     100     200     400
   Reaction Time
   (seconds)    0.1    0.14    0.20    0.28    0.40
   Arrow Speed   Recommended Maximum Distance (yards)
       150        6       8      12      16      23
       175        7      10      14      20      28
       200        8      11      16      23      32
       225        9      13      19      26      37
       250       11      15      21      30      43
       275       12      17      24      34      48
       300       14      19      27      38      54
|
Based on the assumption that the animal is alert, using the formula: |
3.4.2 ...based on Grouping size
"Effective range is the ability to place 80% of your arrows in an 8"circle (20 cm)." - Cleve Cheney.
|

|
The proposed maximum yardage based on accuracy is done in relation to the basic unit of a grouping size - its diameter. A grouping with circumference of 10" (measured as suggested later on), has a diameter of 10/3 = 3.3", and when shot at 50Y, an angle of 0.066"/Y, if you are familiar with MOA, arcTan(dia/(Y*36))*60 = 6.3. It implies on for example small game a shot at the furthest 4"/0.066Y, which is 60Y (A quick approximation is 100x4"/MOA). Building a safety factor into it, doubling the grouping size, this distance becomes 30Y. Here is a table with some values: |
approx. mass (kg)        50   75  100  200  400  800
Average vital dia        4"   5"   6"   6"   7"   8" (also approx)
Circumference "/Y        Recommended Max Distance* (Y)
      24"     0.160      13   16   19   19   22   25
      22"     0.147      14   17   20   20   24   27
      20"     0.133      15   19   23   23   26   30
      18"     0.120      17   21   25   25   29   33
      16"     0.107      19   23   28   28   33   38
      14"     0.093      21   27   32   32   38   43
      12"     0.080      25   31   38   38   44   50
      10"     0.066      30   38   45   45   53** 60
       8"     0.053      38   47   56   56   66   75
 * safety factor=2
 ** shots at 50Y and beyond are generally not recommended.
|
|
3.4.3 Finding your safe hunting distance - without maths
|
No guessing, and no acceptable wounding rate... |
| Further Reading: Cleve Cheney, AB, Mar/Apr 2001, p13, "Optimum Range - knowing when to shoot" Cleve Cheney, AB&A, Jan 2008, p30, "Long shots - why not?" Cleve Cheney & Jan Burger, AB&A, Jan 2007, p39, "Close shooting makes good sense" Engee Potgieter, AB&A, Jul 2007, p52, "Rooibok - die snaarspringkoning" Engee Potgieter, AB&A, Apr 2007, p25, "Bowhunting Bread and Butter" |
3.5 Equipment
3.5.1 Traditional Bows
| Further Reading: Johan Smit, AB&A, Sep 2006, p51, "Traditional bows - stronger than you may believe" Johan Smit, AB&A, Nov 2006, pi, "Watter Traditionele toerusting is reg vir my?" Johan Smit, AB&A, Jun 2006, pi, "Sorg vir jou Tradisionele Boog" Johan Smit, AB&A, Mar 2007, p29, "Tradisionele boog en die spoedmite" Johnny Snyman, AB, Nov/Dec 2000, p28, "Making a Flemish Splice Bowstring" Johnny Snyman, AB, Jan/Feb 2001, p14, "Making a Flemish Splice Bowstring - Part 2" |
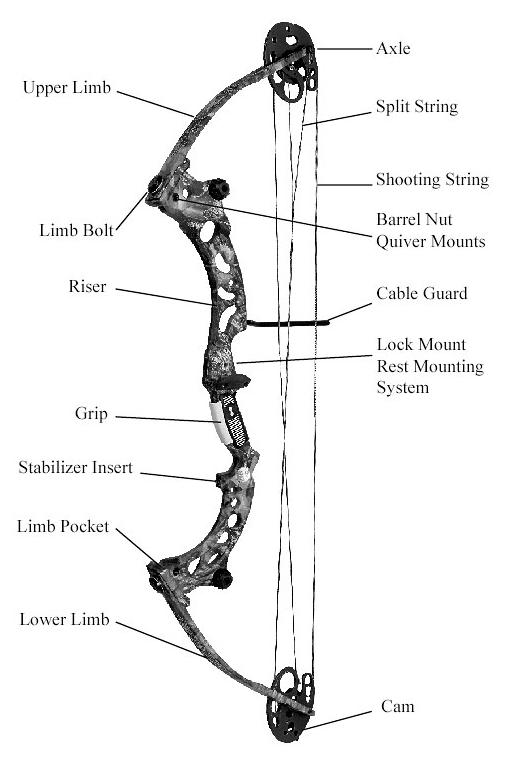
3.5.2 Compound bows
| Further Reading: Seppie Celliers, AB&A, Oct 2007, p51, "Hoe kies ek 'n boog wat my pas?" Herman Brand, AB&A, Nov 2007, p52, "Feite en Opinies" |
3.5.3 Arrow Rests
The very first arrow rest, still in use, is the shelf, or riser of the bow, and against the hand. This works perfectly if your arrows are tuned for the type of rest. The arrow vibrates during release at a particular frequency. When the arrow is released, the string pushes it against the riser, and bends it. This bend initiates a vibration that takes the flights of the arrow out of the way of the riser. Of course, if the arrow vibrates at the wrong frequency, the flights do not clear, and makes contact with the rest. This can cause inconsistent groupings. This is the very reason traditional archers uses feathers for fletching. Feathers are also less rough on the hand. |
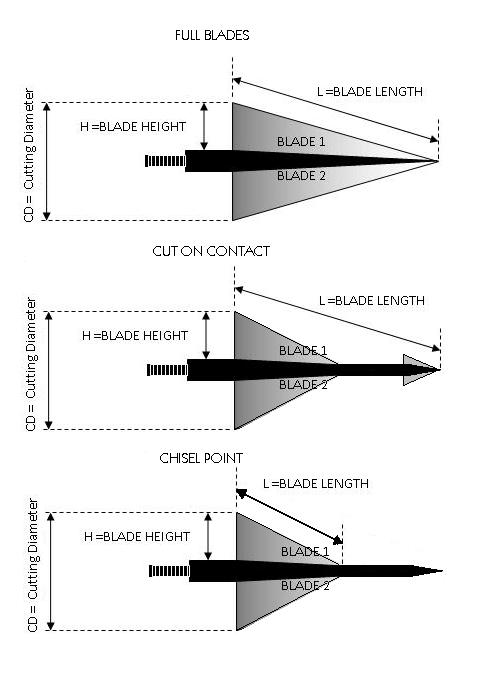
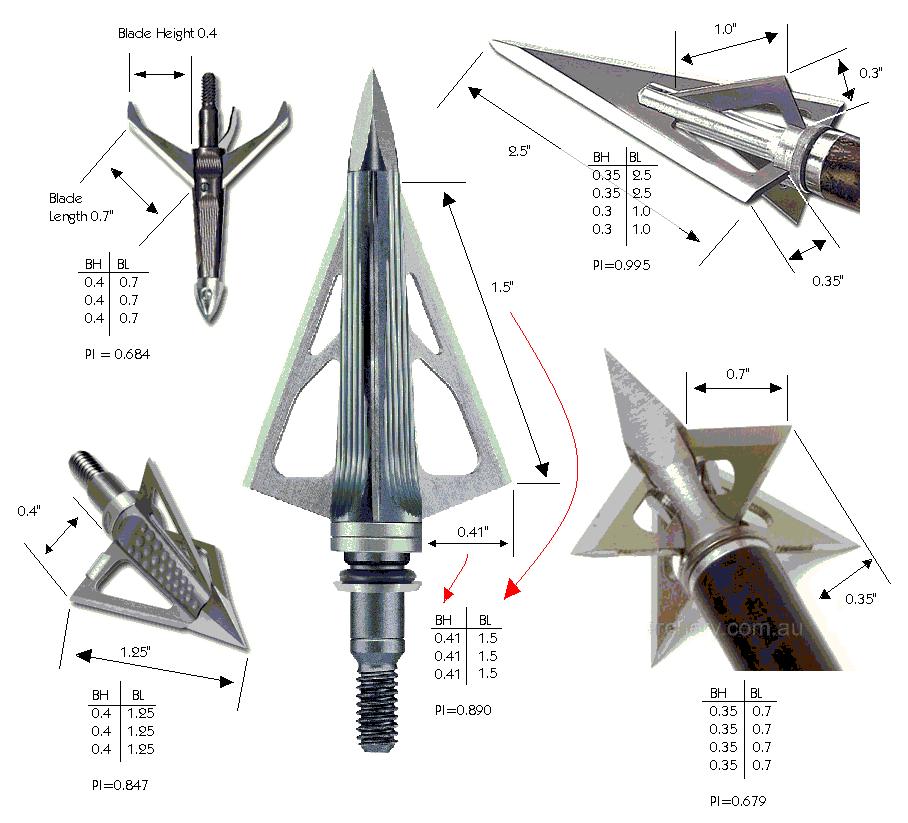
3.5.4 Hunting Points (Broadhead) design
Here's just a small sample of broadheads and variety |

3.5.4.1 Mechanical Points
There are currently 4 types of mechanicals, those that open backwards upon penetrating the skin, those that open by sliding the blades backwards upon skin penetration, opening forwards on contact, and those that open backwards but only after penetrating the full depth of the hunting point's length. |
The first type is the more generally used design, opening backwards. It sometimes causes a small entry wound. It can also be deflected by the opening blades pushing the point away. |
|
3.5.5 Bow Sights and peeps
If you are a traditional shooter, you can skip this section. I won't mind. If you are not, a sight is a useful appendage. There are two major designs, a multi-pin and a single-pin sight. Multi-pin sights are most popular, and has a major advantage. The animal you are hunting will move closer and further, and you will have to change the distance you aim at. With a multi-pin sight you need not adjust any setting, and just shoot on another pin. The drawback it has, is that if you are using really heavy arrows, the trajectory is rather pronounced, and you want to aim at very close to the correct height. If you have set your pins on 10 to 50Y, with 10Y intervals, you will have problems at other distances. My advice to set the pins at 20,25,30,35 and 40Y. You should not hunt at further distances anyway, and closer than 20Y the arrow is traveling fairly straight. I shoot with a single pin sight. The reason is purely personal, I like to aim on the pin, and if the animal is it 37Y, I can set it and shoot. I do not need to aim between pins, something which I'm not very good at. |
You can also spray them with fluorescent paint. A sight light is useful for shooting in low light conditions. Definitely, we are advising you do not shoot late in the evening, unless you have good dogs and lights for the follow up. However, as bowhunters we frequently hide in shades, and shoot at dark coloured animals. |
3.5.6 Broadhead Construction
As a rough estimate, cheap broadheads are not as precisely made as more expensive ones, and the more precisely it's made, the better its aerodynamic properties. Any skew or bent blades will affect the flight path of the arrow, and the effect will increase with increased arrow speed. |
|
3.5.7 Durability
Durability is one of those strange characteristics that are very easy and very difficult to describe. The easy part says it should not break. The difficult one is saying when will it break. In general, most fixed blade broadheads are more robust than mechanical broadheads. |
If it is tough, it doesn't keep the edge so well. One important factor about the steel, if it is too soft, is the edges may not only go blunt easily, but they may even curl around on hitting a rib on entry. This does not only hinders penetration, but also severely diminishes the damage it does. Lung tissue is extremely elastic, and will simply stretch over such a curled edge. This turns your broadhead into a fieldpoint as far as lung tissue is concerned. |
| Further Reading: Sampie Stoffberg, AB&A, Dec 2008, p61, "Die keuse van 'n jagpunt" Engee Potgieter, AB&A, Jul 2008, p15, "What do you expect from a broadhead?" Herman Brand, AB&A, Jul 2008, p61, "Jagpunte ... en jagpunte" Herman Brand, AB&A, Sep 2006, p vii, "Hoe maak mens 'n jaglem bangskerp?" Johan Smit, AB&A, Aug 2006, p ii, "Watter jagpunt is die beste een vir tradisionele boogjag?" Herman Brand, AB&A, Aug 2006, p iv, "Hoe skerp is skerp?" Fritz Rabe, AB&A, Apr 2006, p25, "Hunting the heavies" Dave Holt, AB, Jan/Feb 2001, p7, "Testing broadhead accuracy" |
3.5.8 Arrow stability
There are various factors influencing arrow stability, or how long it takes for an arrow to stabilize after release. In general, longer arrows stabilize quicker, heavier ones slower. But spine, and its center of gravity play major roles. By the way, we assume you have tuned the bow for center shot and straight nock travel. |
3.5.8.1 Static Spine and Dynamic Spine
|
What is true about all arrows is that they bend upon being released. In fact, if you put a static force on the back of the arrow, you'll see the arrow totally collapse at about 20 to 30lbs. Yet, they don't, even when shot in 100lbs bows. The fact is that they actually do collapse, but since they are so quickly out of the bow, they don't get time to bend all the way and break. |
|
For all traditional bows, and most recurve bows, spine plays an immense roll in getting the fletching past the riser, without it touching the riser. The arrow�s stiffness is precisely matched with the bow�s poundage, in order for the first harmonic of oscillations to carry the fletching clear of the riser, as the arrow bends. You can imagine this as if the arrow slithers like a snake around the riser. |
In any case, if the arrow is too stiff, for traditional bows you won�t get flight clearance, and for cut-out risers you�ll get the point of the arrow being pushed up or down. If the arrow is too limb it simply bends too much, and the broadhead will steer the arrow all over the place. Again traditional archers won�t get clearance, since clearance depends on the timing of the arrow bending left and right. For cut-out risers, the arrow will simply steer tail-high or -low, causing porpoising arrow flight, and you can look at paper tuning for more on this problem. |
|
Dynamic spine is affected by the following: |
(By the way, this arrow will have a FOC of 17% - see Front Of centre for the significance of this.) The starting point for our discussion on how far it will bend is to use the critical load under which it will buckle. This is the critical load we mentioned above. The effect of the string on the arrow is to bend it. More power will bend it more, but not faster. The amplitude of the vibration is determined by the force you apply to the arrow (in fact by the force of the arrow on itself because of being accelerated, but that is getting too technical), its length, weight and stiffness. The frequency of the vibration is not. The critical force that buckles the arrow is defined by Euhler as: |

|
|
Reports were received of a CLP over 200% that is still accurate. When thinking this over, you may realize that the weight of a shaft relates only to the spine, if the shaft was built as light as possible - think material limitations. Above the minimum weight, it is independent of the static spine. But increasing the shaft weight does increase the dynamic spine. This is because the arrow accelerates slower if it's heavier, for the same draw weight. Remember, the arrow actually bends because it is compressed between the string, and the g-forces of the broadhead and shaft.Since the g-forces are less if it accelerates slower, this compression force is less. Also, this compression force is translated into the lateral force that bends the shaft, and since the shaft is heavier, the same force would have bend it less - more mass to move. At the same time we just said the force is actually less. Therefore, the displacement of the shaft is less. The heavier arrow, with the same static spine, actually has a stiffer dynamic spine. This in effect decreases the attack angle of the broadhead, and so increases accuracy. |
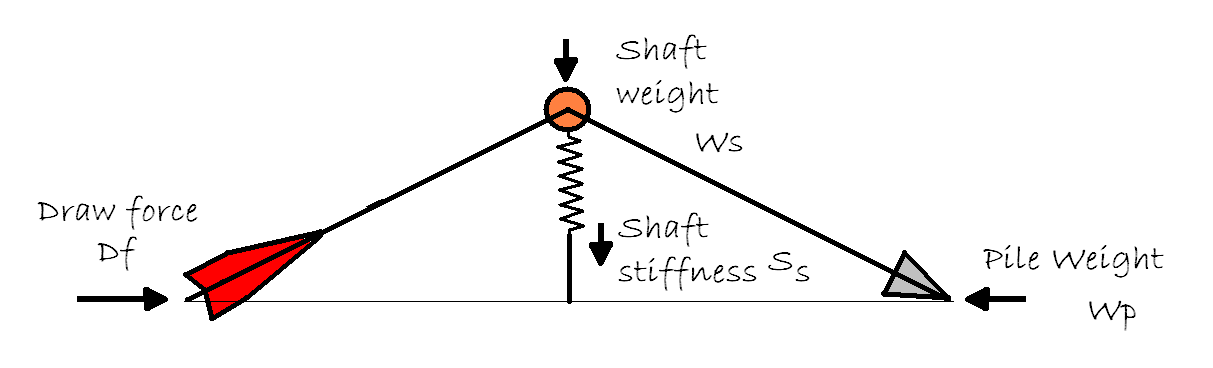
Important to notice is that the arrow bends not according to the bow�s draw weight, but according to the "g-forces" it experiences being accelerated. This force is twice the product of the arrow�s pile weight and acceleration. Also notice that weight behind any point on the arrow�s shaft, cannot add to the weight that bends the part behind it, but instead adds to the weight that resists the bend. Therefore the total weight that bends the arrow is the pile weight plus about half of the shaft weight (Wp + Ws/2). Also the fraction (R) of the force that bends the arrow is proportional to the ratio of the already existing deflection, to half the distance from the nock to the point: |
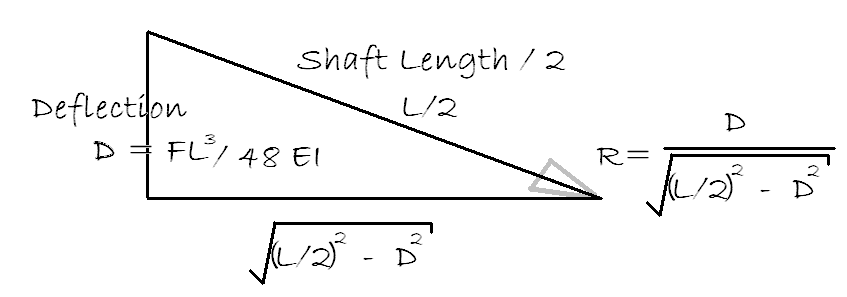
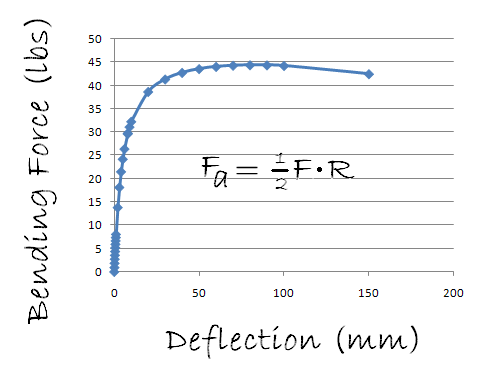
The spine, modeled as a spring, resists this bending force, and this resistance increases with the deflection. If the shaft is perfectly straight then the curve of the axial force needed to bend the arrow starts of at its critical buckling force, and decreases as you bend the arrow. To see if this makes sense, we can draw a curve of the deflection and compare it to the axial force needed to bend the arrow. More realistic, if the arrow is not perfectly straight, or the force is slightly off centre, the axial force curve looks like the one shown here. Calculating the critical buckling force the arrow, in this case, 47.2 lbs (calculated by the approximation done by Euhler's equation), we can see that it closely resembles the curve�s maximum of about 45lbs. |
Another interesting feature of this model is the decrease of the resistance against deflection as the arrow is bent beyond a certain point. This resembles the catastrophic failure of an arrow that is pushed too hard - it reaches a point where the arrow needs less force to bend it further than it is currently supporting, and collapses. |
You will recall I mentioned earlier that any mass in front of a certain point on the shaft bends it, and the mass behind this spot resist the bend. If you add all the weights before and after all points on the shaft, you will see that the shaft weight adding to the bending force is half of the shaft weight, and the part that resists it is the other half of the shaft weight.If we take these forces and apply them for a fraction of a millisecond to the model each time, until the arrow escapes the string, we can calculate how far it bends. |
| Parameter changed | Range | Deflection (mm) |
| Draw weight | 50 to 90 lbs | 4.6 to 12.8 |
| Broadhead weight | 65gr to 200gr | 7.1 to 10.6 |
| Spine | 200 to 600 | 3.8 to 15.3 |
| Shaft Weight (gpi) | 6 to 14gpi | 10.4 to 7 |
| Shaft length | 26" to 32" | 5.2 to 9.7 |
| Arrow Straightness | 0.006 to 0.001 | 8.4 to 8.0 |
| Arrow Rest | 0 to 2 mm out of place | 7.2 to 11.8 |
| Nock travel | 1 to 4 mm deviation | 3.8 to 10.7 |
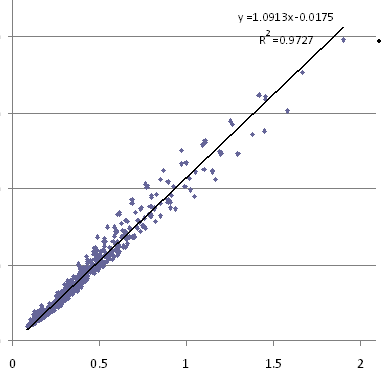
There are many and varied factors influencing dynamic spine. The model presented here, based on a simple interpretation of Newton�s laws of motion and numerical analysis, predicts the effect of most of these parameters. The prediction of the bending of the shaft during release may not be extremely accurate, however the changes in the bending is fairly consistent with what would be expected from a real arrow. |

(Dw draw weight, DL draw length, Bh brace height, Wp pile weight, L shaft length, Ws shaft weight, S spine) |
For example, for a pile weight 215gr, gpi 13, spine 280, 30" draw length, 7.25 brace height, 72 lbs and 29" shafts, it predicts a deflection of 8.5 mm. I have a suspicion that this is a fair deflection for a 600gr arrow at 262fps. Easton�s spine charts in general try to keep the deflection of the arrow below 10mm. I would suggest you can start at 10mm, and decrease the s-spine of the shafts you test, to about 5mm. The best value will very much depend on your bow, since nock travel, inherent from the bow�s design, will place a limit on the stiffest arrow that still group nicely. |
Now let's look at traditional bows and dynamic spine... |

The total weight of the arrows he tested varied from 291 to 500 grains, the s-spine from 700 to 390, the length from 32.3 to 27.4", and pile weights from 89 to 180gr. The largest error was on the arrow with the smallest shaft weight (5.9gpi), and it was a mere 3.1 Hz more than the measured value of 87.6Hz. The equation describes 98.7% of the measured values - as theories go, this is GOOD. |
Arrow Wt L Wp Ws S Fm Fp Error Wood HPD 500 32.3 126 10.9 550 50.4 49.6 -0.8 X7 1914 375 28.8 100 8.9 660 65.9 64.1 -1.8 XX75 2213 440 30.6 129 9.5 460 67 65.2 -1.8 X72314 525 30 180 10.8 390 68.9 69.3 0.4 Cartel Tri 700 291 29 92 6.1 700 75.8 74 -1.8 ACE 520 292 30.3 89 6.0 520 79.7 78.8 -0.9 ACC 560 325 27.4 103 7.3 560 83.5 85.5 2.0 ACE 520 308 28.5 120 5.9 520 87.6 90.7 3.1 |
The next question you will ask now is what frequency is the correct frequency for your bow. Stu Miller has developed and excellent spine calculator for non-compound bows. It has a collection of a huge number of commercial shafts, and he actively keeps this up. You will find it easily with Google. I used this calculator of his to compare results of my model with his empiric formula (empiric: based on describing the relationship and not explaining it). (Just a short reminder: The frequency will determine how fast the arrow vibrates or bend, and therefore how much time it will take to move the fletches out of the way of the riser as it passes to the side of it.) |

D is draw length, B brace height, F draw weight, and Wt is the total arrow weight. |
            Wp  Ws  S   DL  Bh  DF  L       Wt  fps millis  Fn(arrow)   Fn(bow) Error(Hz)
xx75 2213   150 9.5 460 30  8   50  31.5    449 194 19.8    54.2        50.6    3.7
            125 9.5 460 30  8   60  30.65   416 219 17.5    57.7        57.1    0.5
            100 9.5 460 30  8   70  30.13   386 244 15.7    60.3        63.6    -3.3
1914        150 8.9 660 27  8   46  29.3    411 179 18.6    54.1        53.8    0.3
            150 8.6 660 27  8   56  27.8    389 202 16.5    61.1        60.6    0.5
            125 8.6 660 27  8   65  27.4    361 224 14.9    63.3        67.3    -4.0
|
These arrows are matched to the bows using Stu Miller�s calculator. As you can see the frequencies we predict is slightly different. In the next table, I have matched the arrows to the bows using the frequency. You may notice that according to this prediction, the last arrow may be slightly too short. |
            Wp    Ws  S   DL  Bh  DF  L       Wt  fps millis  Fn
xx75 2213   150   9.5 460 30  8   50  32.8    462 192 20.0    50.0
            125   9.5 460 30  8   60  30.8    418 219 17.5    57.1
            100   9.5 460 30  8   70  29.2    377 246 15.6    64.2
1914        150   8.9 660 27  8   46  29.4    412 179 18.6    53.7
            150   8.6 660 27  8   56  27.91   390 202 16.5    60.6
            125   8.6 660 27  8   65  26.46   353 226 14.7    67.9
|
|
| Further Reading: JP de Villiers, AB&A, Oct 2008, p52, "FAQ" Seppie Celliers, AB&A, Dec 2007, p30, "Arrow Spine" Harry Marx, AB&A, Mar 2009, p30, "Dynamic Spine and Building Heavy Arrows" Harry Marx, AB&A, in press, , "Dynamic Spine II" |
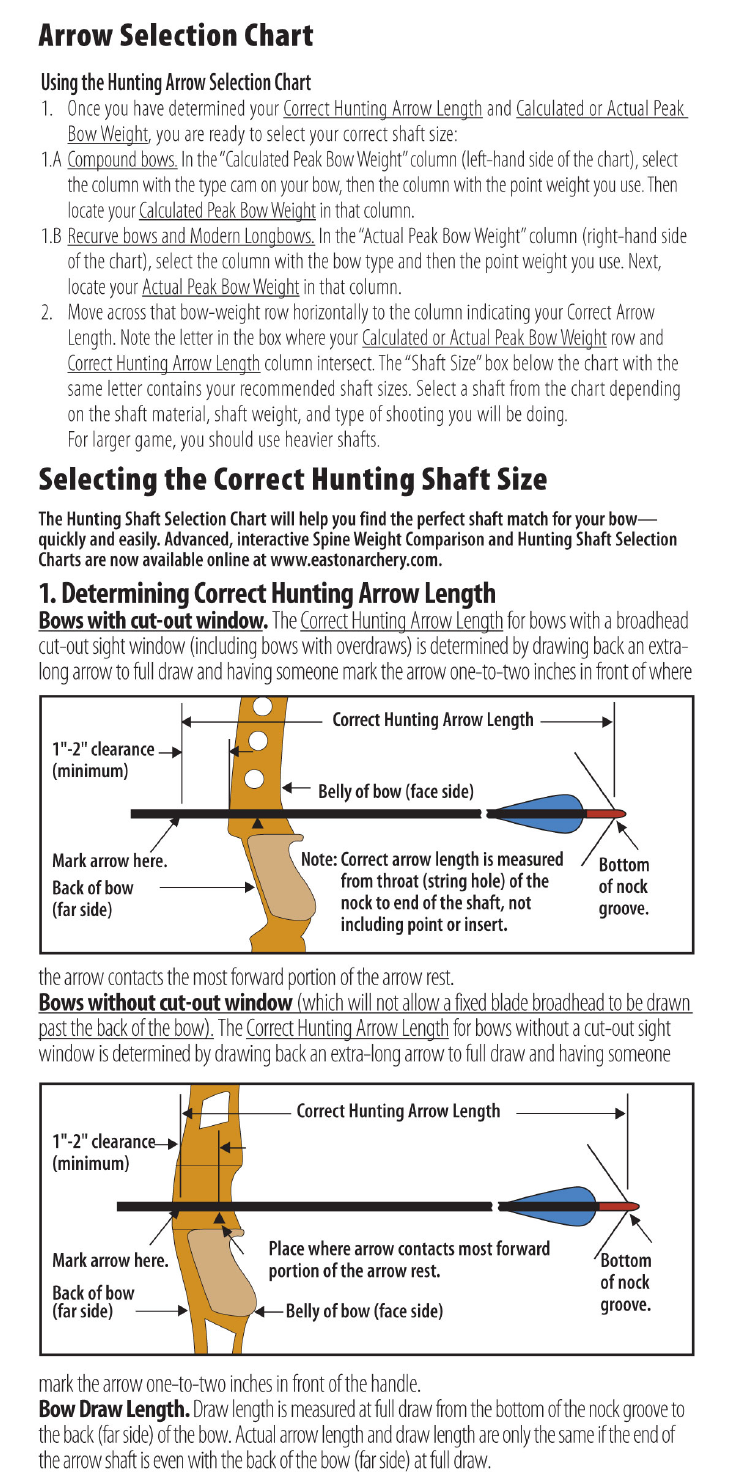
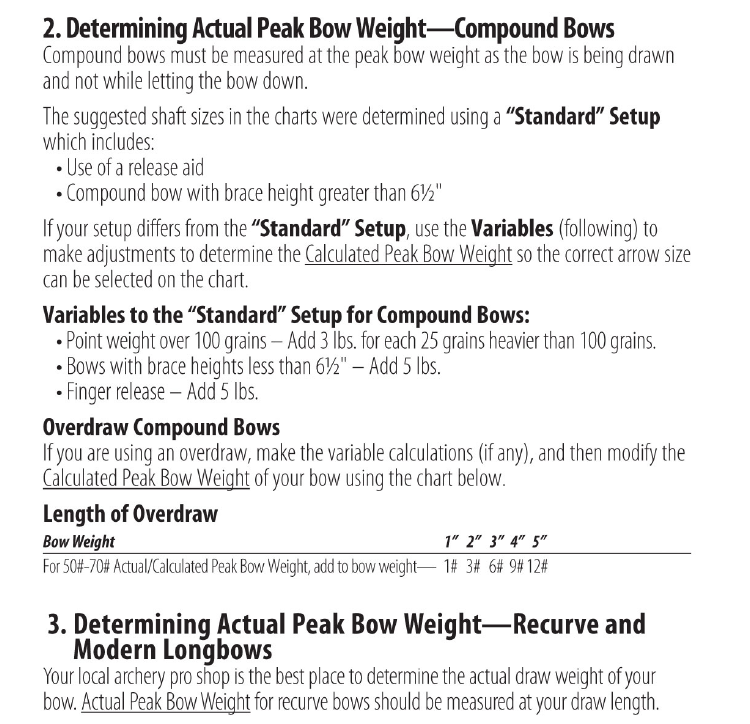
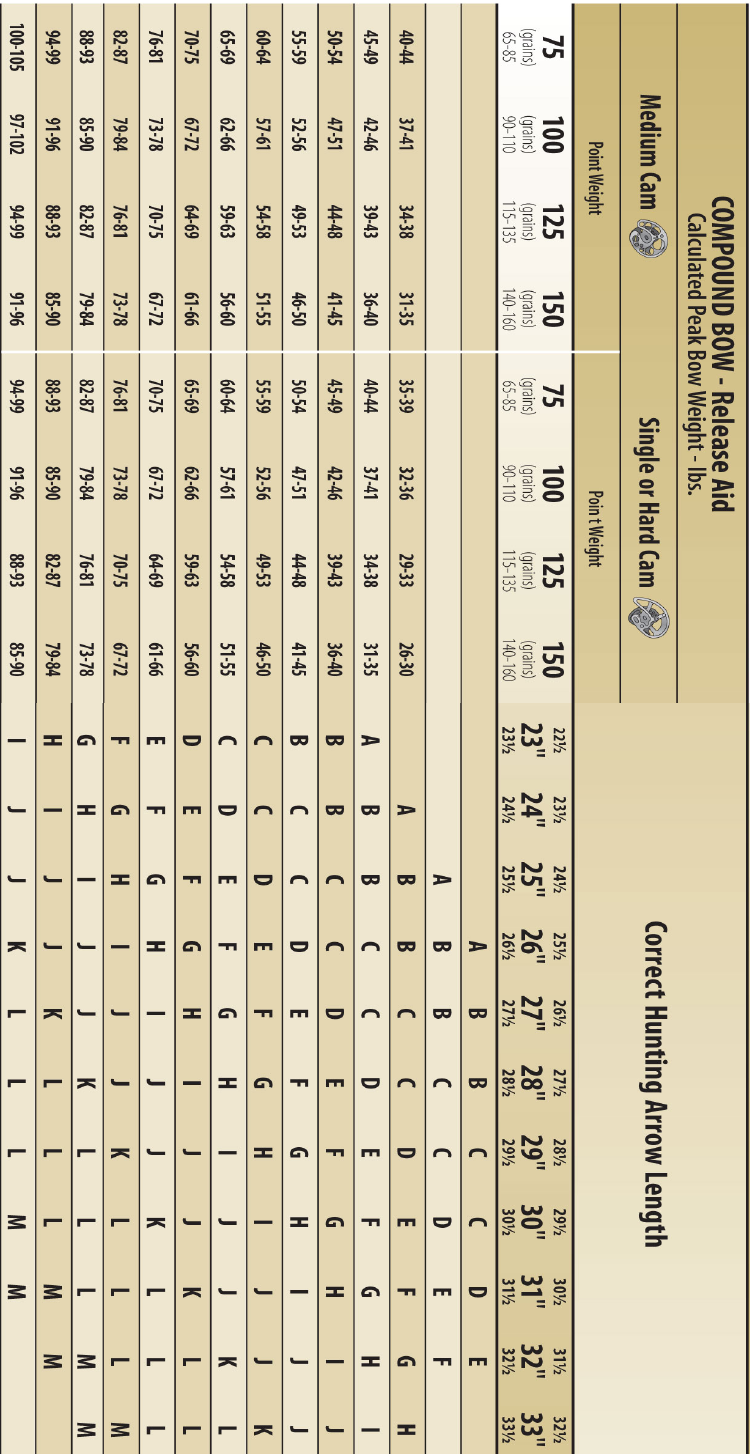
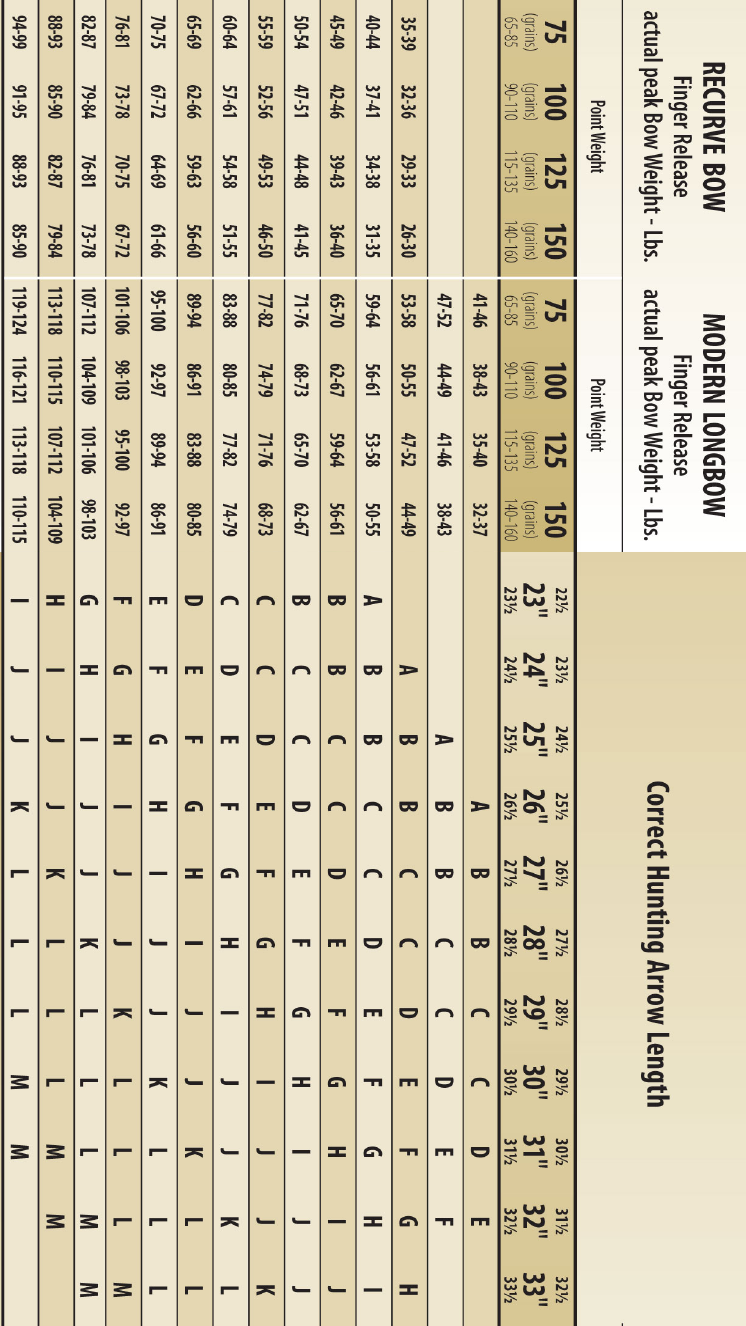
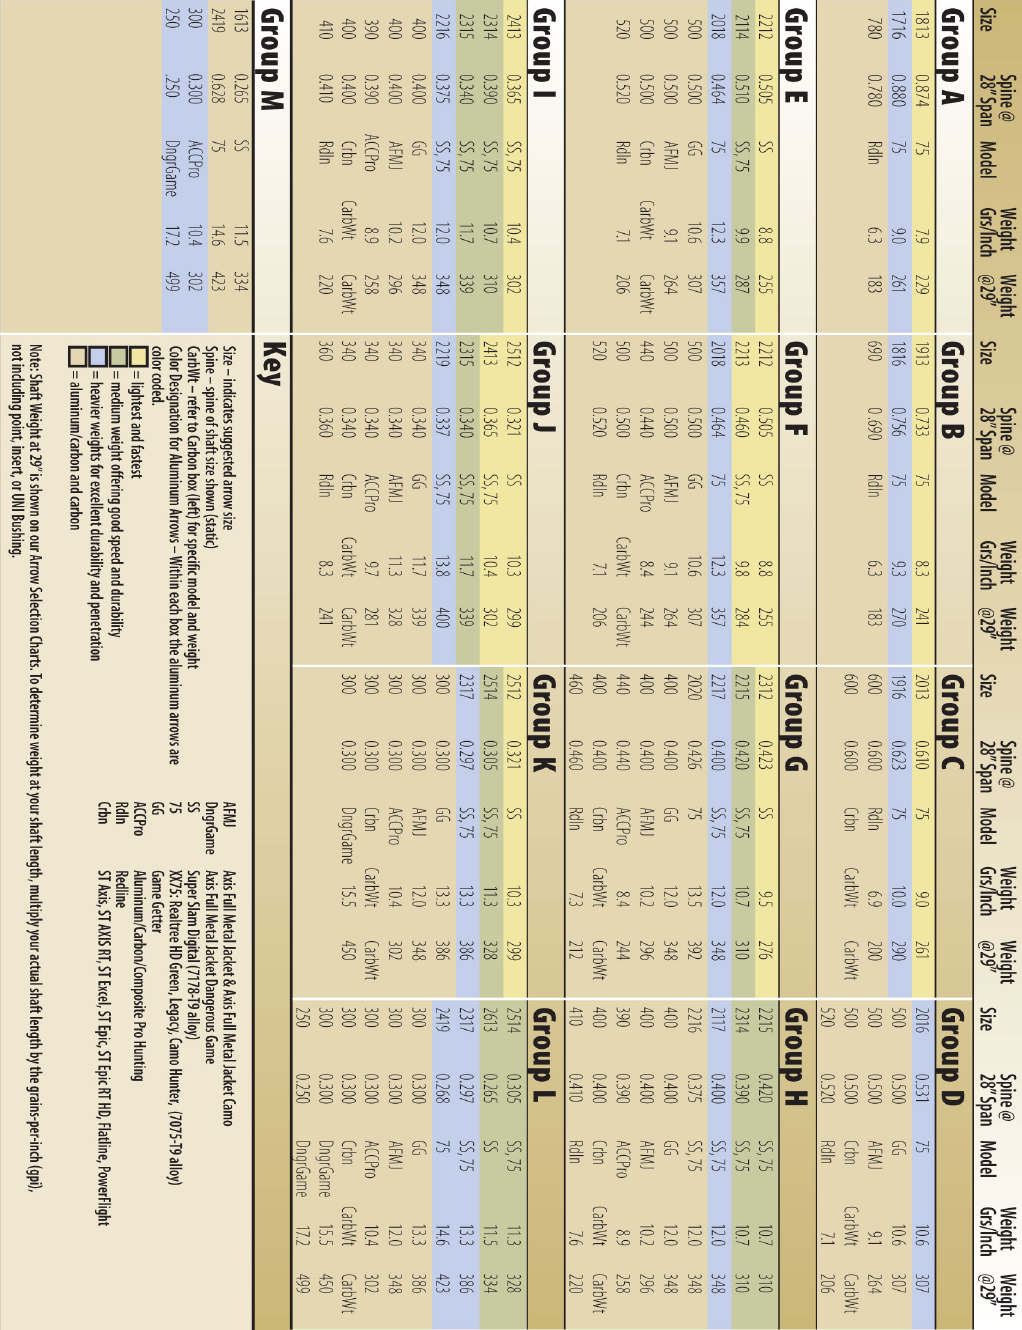
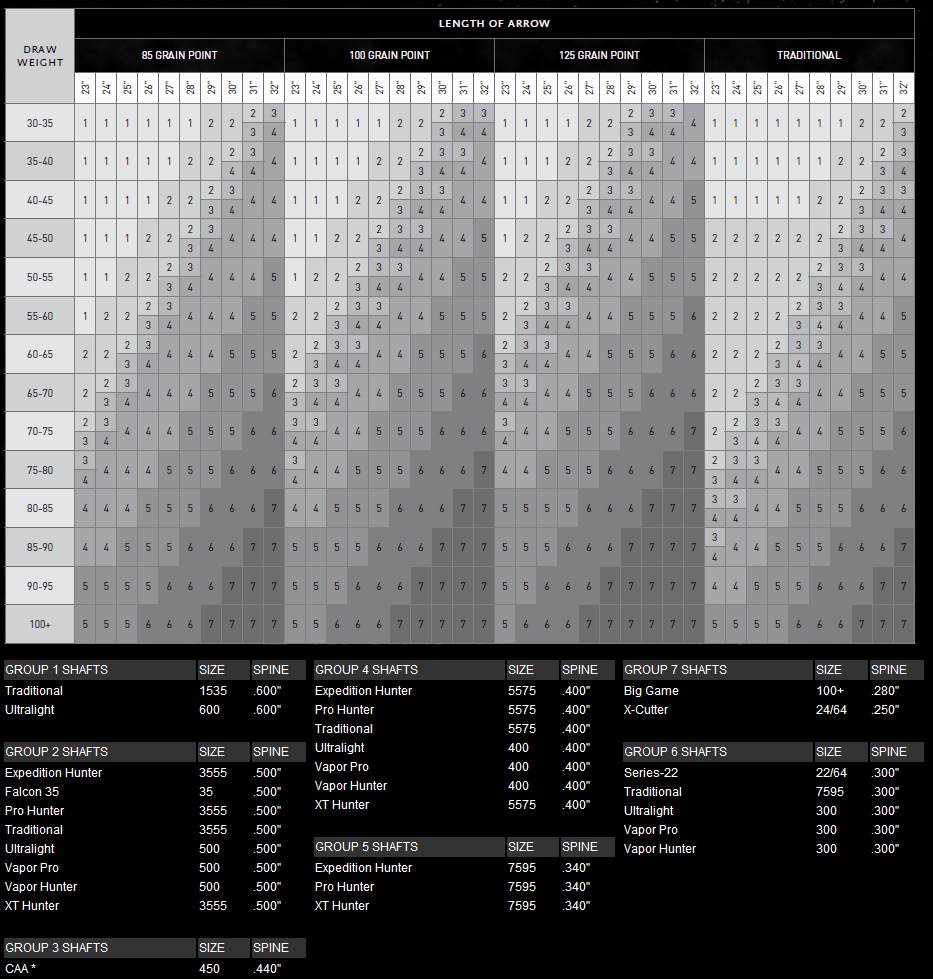
3.5.8.1.1 Easton Arrow selection charts
These are the charts for Easton and GoldTip. We include it here for instructional purposes. Although the specific arrow models change, the s-spine requirements is always relevant. |

3.5.8.2 Arrow Spin
|
Once the arrow�s spin reaches the rotational speed at which it can�t be spun quicker, due to the angle of the fletching, this drag falls away, and the arrow no longer loses speed to spin it. If the arrow now looses speed due to gravity or friction, it can actually be spinning faster than its fletching angle and speed dictates. This can decrease the stability of the arrow at long distances(>60Y), as it moves the centre of pressure forwards. Quantifying this effect has been attempted, but for now you should just take note of this effect. |
|
Increasing the size or angle of the fletching usually only works to a certain degree. Then the increased rotation speed actually causes this unbalanced arrow to start to wobble. It is therefore not wise to try and stabilize an already wobbling arrow with bigger fletches. The better solution is to balance the arrow, or to get rid of it. If the unbalance is due to the broadhead, you can try another broadhead on it. Sometimes it�s due to the "insert" not being inserted straight. Mostly it�s due to a used broadhead that bent slightly during a previous shot. Spinning the arrow on its tip or in an arrow spinner usually detects such an unbalance. Sometimes you only see it as a unwillingness to group. |
|
The spine of an arrow must match the bow to start of with. In hunting, the spine must also match the resistance especially in heavy bows with fast arrows. Most spine charts give the spine stiffness for acceleration. This is fine for target shooting but not for hunting. In hunting, the arrow sometimes come to a stop in a shorter distance than it accelerate out of the bow, [for eg. when] striking a bone. |
|
The less an arrow flex, the more momentum it has. The faster it stabilizes the better it flies." |
| Further Reading: John Dudley, AB&A, Mar 2008, p30, "The Best Fletching For your Arrows" JP de Villiers, AB&A, Mar 2008, p48, "FAQs" Sampie Stoffberg, AB&A, Jan 2009, p56, "Die keuse van vere" |
4 In Practice
|
4.1 Using a bow
| Further Reading: Seppie Celliers, AB&A, Jan 2007, p42, "Boogterme" Rean Steenkamp, AB&A, Apr 2007, p47, "Eye Dominance" |
4.1.1 Tuning a bow
A bow and arrow is a complicated machine that needs expert tuning for optimal hunting performance. We recommend that a bow hunter should practice to shoot accurately with the highest poundage possible. It is recommended that the bow is tuned in order to maximize the energy transferred from the bow to the arrow. Thus the right selection of combined optimal equipment is critical and each component of the bow hunting set-up must be carefully selected. |
4.1.2 Cam Tuning
Although cam tuning is (almost) always done in the shop, you need a bow press and a bow shooting machine, we discuss it here for the importance of this step. And contrary to popular hype, even binary cams needs to be tuned. Of course this does not apply to single cams... |
4.1.3 Paper Tuning
The purpose of paper tuning is to set the arrow rest's height and the preliminary lateral position. You need to do paper tuning, and then "walk back tuning", to get good flight from arrows with hunting points. |
| Further Reading: JP de Villiers, AB&A, Nov 2008, p52, "FAQ" Herman Brand, AB&A, Sep 2007, p13, "Paper tuning your bow" |
The rest should be adjusted up or down, until the shaft's tear is horizontal. |
4.1.4 Walk back tuning
This is done with hunting points. The sight is first tuned for 20, 30, 40 and 50Y. Once you are no longer able to increase the precision with the lateral adjustments of the sight, you can start with walk-back-tuning. |
Then you can tighten the rest's screws and check it once every 1000 or so shots. |
| Further Reading: JP de Villiers, AB&A, Sep 2008, p52, "FAQ" John Dudley, AB&A, Nov 2007, p30, "Walk-back tuning with broadheads" Seppie Celliers, AB&A, Nov 2007, p55, "Stel jagpunte in - maklik" |
4.1.5 Nocking Height Tuning
What is the influence of the nocking position on how a bow performs?
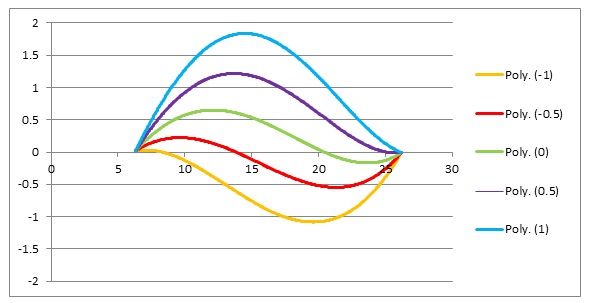
|
The horizontal axis of this graph is inches drawn, while the vertical axis is millimetres above the centre line. Since the arrow rest is at 0" drawn, you can extent the general direction of the nock with a pencil, and see where it will cross the 0" point. For the bottom line (1mm low) it will fly over the shelf at about 14mm, whereas at 1mm higher, its being pushed on a line below the shelf!
|
But I think we are not really seeing the drastic effect these nock movements have yet. |
Since the D-loop is usually done over serving, the serving can act as a thread on which you "screw" the D-loop up or down. This also makes for "fine tuning", since the serving thread is typically less than 0.5mm. So you have a fairly fine thread on which to rotate the D-loop.
|
|
4.1.6 Tuning arrows
The last step tuning your setup is looking at the arrows. By this time arrows with broadheads and fieldpoints should be hitting close to each other. If they do not, it most probably means that the arrows bend too much as they leave the bow, i.e. they are under-spined. You can try more stiffer shafts. |
4.1.7 Practicing
Confidence in your ability to hunt is locked up in the aged old saying "practice makes perfect". SABA simulates hunting conditions on a monthly bases on African animals in 3D competitions in order to harness our members with knowledge and confidence of optimally used equipment and arrow trajectory in real hunting light conditions. "Bokkoors" can�t be simulated but can be overcome with the confidence coming from experience in the hunters shooting ability. Every aspect of the hunt should be coupled with confidence. |
4.1.8 Anchor Points
Archery is almost always a mixture of old and new, and anchor points are a point in proof. Shooting consistently is only possible if you have a constant anchor point, and bow grip. In time, with new developments that aid with consistency, many archers neglect the anchor point and grip. The rationale is of course that with a peep, who needs an anchor point? In fact, as of date there are even two products on the market that "eliminates" a peep, and therefore can be seen as to make a consistent anchor point even less important. |
|
Some archers anchor below the chin, some against a lucky tooth, some behind the yaw bone, and so on. I anchor with a knuckle into the back of my ear. Of course, when using a mechanical release, your options are very much defined by the type of release. One interesting variation is to anchor the thumb behind the neck. This provides a very stable support for a very long draw length. Some archers also believe in a third anchor point. This is usually done by touching the tip of the nose to the string. Kisser buttons are also popular with traditional archers, which is a brass nut or even just a small leather strip knotted to the string. The idea is that you put this physical marker on your mouth or lips, on a particular spot each time. |
On holding the string with your fingers, there are two schools: the Mediterranean way, and the apache way. The Mediterranean way uses two fingers above and below the arrow, while the apache hold puts just one finger above the arrow. Some people shoot with three fingers below the arrow, and none above. |
As you can see on this drawing, the string arm is also supplying lift to the bow-arm when it draws the bow. The height of the anchor point above the shoulders determine how much of this pull is used to keep the bow up, vs. drawing the string back. |
If you experience this again, try pulling harder at the string, and you will see the bow lifts suddenly. This "below the spot freezing" is not a sign of panic, it is more an indication that you are relaxing your body, as it should be. |
4.1.9 Draw length
Determining the correct draw length is important, and very easy. Measure your arm's span from fingertips to finger tips, stretched out to the sides against a wall, and divide this with 2.5. Use this to set the bow's draw length, and then you can fine tune it further with either adjusting the cams, or string length, or even the D-loop length. |
4.1.10 The Grip
The solution is of course that when you do relax your chest muscles, you must pull a bit harder with your back muscles, to get the string-arm's shoulder to rotate further back, and therefore to pull slightly harder - to lift the bow into line again. But after all, the anchor point you use, should be comfortable, and by definition, this will be close to the point of balance. When talking about bow grips, I got the following advice. The top of the handle should lie in the V of the thumb and the hand, and the bottom part should rest against the heel of the hand, between the thumb and the hand muscles. In other words, the top of your hand should be about 40 to 45 degrees turned out, while the bow is vertical. |
|
There are a few products on the market that promises to eliminate bow torque. |
|
4.1.11 Aiming Technique
There is generally two ways to aim, without or with a sight. When shooting without a sight, you have to judge the trajectory of the arrow. This takes extreme levels of practice to achieve. Mostly used by "traditional hunters", which are shooting with longbows and recurves. There are a few archers who have achieved unbelievable accuracy in this way, however, most hunters are more successful using sights. Shooting instinctively does have the advantage of being fast. It is possible to aim and shoot in much less time than it would take using sights. This is a technique to be practiced, and very little else can be said about it. |
|
In exactly the same way that a thin myelin sheet increases reaction time, overriding these reflexes with conscious control, takes way longer. This of course increases the unwanted shaking movement. With practice, an action becomes unconscious. This is indeed what happens, and in becoming unconscious, it also becomes faster. Further practice, and honing of this unconscious skill, will reduce the time for feedback even further. The conclusion to cure the wandering sight syndrome is to relax and not to think about it. Aim like riding a bicycle. |
|
Generally however, you will find that you approach the target with the open area of the sight. If the pins are fastened onto the right half of the sight ring, the left side will be open, and you will find yourself approaching the target with the pins generally from right to left. This would suggest the best pin configuration to be hanging from the top of the ring, which sadly is not available. In fact, single pin sights usually have the pin fixed to the bottom of the ring. |
4.1.12 The Release
One of the most important steps in shooting is of course the release. Target archers have a great advantage over hunters, in that they can employ what's called a "surprise release". In effect, the release is done in such a way that the archer is unable to predict the exact moment the release will occur. This in turn implies that they are not able to "compensate", or pre-empt it, with some muscle action. The idea not that the release should take you by surprise, it merely means that you should not be able to pre-empt the exact moment it will occur. |
|
|
A reminder - the palm of the hand holding the bow should be about 45 degrees with the bow. Also your elbow must be bent - if not, the bow's draw length is too long. Your elbow should also be bent away from the bow, and not down (else you will get string slapped). Now the follow through - your hand should just keep on pushing the bow straight forward as the follow through. If your arm was straight, the bow will instead jump to the left. With the bent arm, it travels forward and do not affect the arrow's flight... |
| Further Reading: Roy Gaylard, AB&A, Apr 2006, p36, "Instructions for beginners" |
4.1.13 Shooting uphill or downhill
The trajectory of an arrow is actually quite a complex model. The complicating factor is that friction in air is dependent on the square of the velocity of the arrow. It is of course also dependent on the arrow design, its broadhead and fletches, and how it travels. An additional factor is the angle of the fletches. This causes more friction during release, but potentially a straighter flight, endless friction at the last stages of the flight. |
Newtonian Model
  Angle
   45:  6.5  14.2  21.5  29.1  36.7  44.4
   40:  7.5  15.3  23.3  31.4  39.7  47.8
   35:  7.7  16.5  25    33.5  42.2  51
   30:  8.7  17.2  26.4  35.1  44.2  53.4
   22:  9.2  18.6  28    37.6  47.2  56.7       The Cos-Rule:
   15:  9.4  19.4  29.1  39    48.7  58.7       which is the same up or down
        10Y  20Y   30Y   40Y   50Y   60Y            10Y  20Y  30Y  40Y  50Y  60Y
  -15:  9.9  19.4  28.9  38.3  48    57.4       15  10   19   29   39   48   58
  -22:  9.4  18.6  27.8  36.7  46    55         22   9   19   28   37   46   56
  -30:  8.9  17.5  25.9  34.4  42.9  51.2       30   9   17   26   35   43   52
  -35:  8.4  16.5  24.5  32.4  40.6  48.5       35   8   16   25   33   41   49
  -40:  8    15.3  22.9  30.3  37.9  45.3       40   8   15   23   31   38   46
  -45:  7.5  14.2  21.2  28    34.9  41.7       45   7   14   21   28   35   42
|
An exact formula for calculating the compensation for uphill and downhill shots does not exist. However, the following approximation also works well: |
|
Some rangefinders already calculate this for you. With older ones, you can pick some other object that is directly below or above the animal. What is also important about these shots is the way in which it's done. You should preserve your shooting form when doing so, and not lower or raise your bow arm to make them, but bend at the waist. Draw and anchor the shot as if the target is straight ahead. Then bend in the waist to aim. |
| Further Reading: Harry Marx, AB&A, Mar 2008, p14, "Compensating for shooting at a slope" |
4.1.14 Shooting through a gap
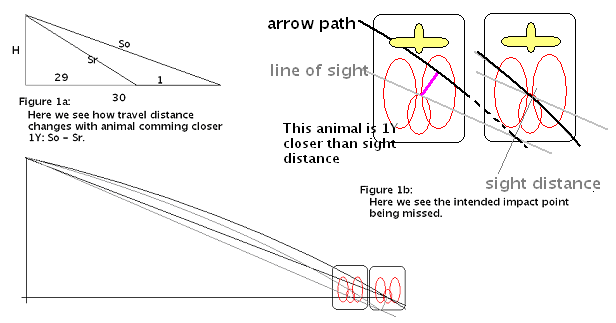
Often when you walk and stalk, and even more often if you shoot from cover, you have only a narrow gap to shoot through. This gap may be directly in front of you, but it may be anywhere between the animal and you. Knowing the arrow's trajectory can allow you to miss these obstructions, and shoot a perfect shot. |
|
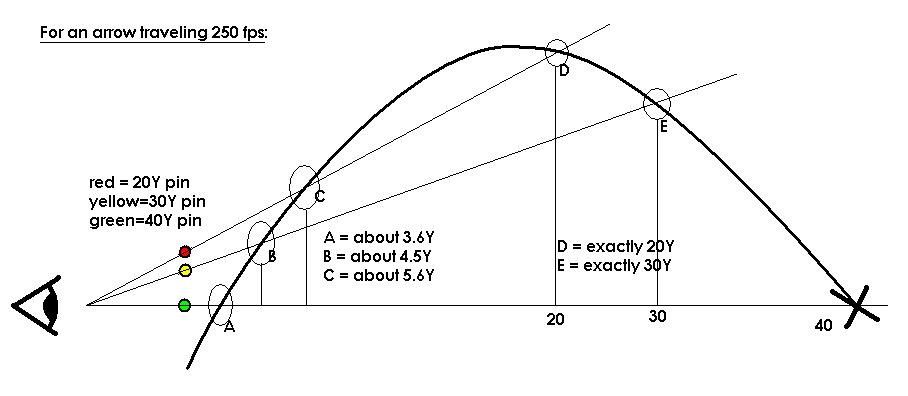
The arrow passes through the loops at various distances. What is very useful to note is that if you moved loop E, such that the arrow falls through it on the 30Y pin's line of sight, that loop will be at 30Y. In other words, if the loop (or gap) is at 20Y (as is loop D), the arrow will fall through it if the 20Y pin's line of sight is on it! |
4.1.15 Target Panic
Every archer and hunter experiences target panic at least once. It can take a number of different forms: the inability to release the arrow (freezing), the inability to move the sight on to the target, or snap shooting - releasing the arrow the instance the sight passes the target. |
|
Shooting at 5Y with your eyes closed is also suggested frequently. I found this generally to increase anxiety, and do not suggest it. You will probably need to return to these treatments in time. I found it useful to include these activities as part of my normal exercise routine. |
If you have been shooting for a long time, a different problems starts to rear its head. You start to shoot more "instinctively" (without thinking). This sometimes causes you to "lose control" of your trigger finger.As the pin approaches the target, the shot simply goes off - and you never instructed your finger to pull. You can easily measure the degree to which you are already suffering from this. When aiming next time, put the pin on the target, touch the trigger, but do not pull it. If you can do this, you are still "in control". If you cannot, well, you have a problem. The feeling is similar to the urge you get to close your eyes when someone threw sand in them. It is almost unstoppable - the shot MUST be done... I know, since I suffer from this. But luckily there is a good treatment for this as well. You see if some action is being performed unconsciously due to repetition, you only need to change the action and it will "bounce" back into consciousness, or conscious control. The treatment in this case is to change the finger you pull the trigger with. Doing this change often keeps the process from falling into unconsciousness.
|
| Further Reading: John Dudley, AB&A, Jan 2008, p15, "Curing Buck Fever and Target Panic" |
4.1.16 Arrow Care
Make sure you arrows are clean. When shooting into 3D targets, often some of the material sticks to the arrow. This should be removed before you can shoot with the arrow again. This material not only make the arrow lie incorrectly on the rest, but can also bump it in any direction as it is released. You can rub the shafts in hard, old soap to protect them against it. |
4.2 Preparing for the hunt (overview)
Your equipment must be in top working order and you must know which animal category can be hunted with the bow equipment as a whole. Prepare thoroughly and check each component for optimal mechanical operation. When arriving at the game farm, be thoroughly briefed and get the farm�s rules and regulations together with a price list of animals that may or may not be hunted. Always have a knife and a good wire cutter in your daypack to remove snares set by poachers. |
4.2.1 "Walk and Stalk"
JC Botha, former chairman of SABA, has the following to say about walk and stalk":
|
A pair of protective gloves is essential for when you need to walk on your hands and knees. I use second-hand military police leather gloves and cut them down to size. They are very strong and last for many seasons.
|
Also when spooked they prever to move against it. This is all because the smell and sounds are carried by the wind, and allow the animals to "see throught" the bush. Moderate wind will also provide you with a sound cloak - in that the grass and leaves' sounds will drown your movement's sound.
|
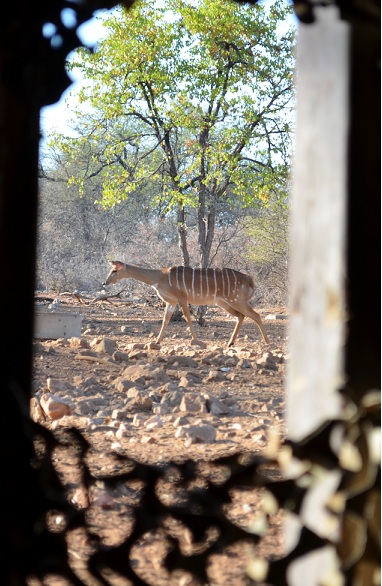
4.2.2 Hunting from hides
Whenever a rifle hunter pictures this scenario, a bowhunter in a hide, waiting for animals to come drinking, salt licking, or feeding from lucern or other special feeds, they get REALLY agitated. Aparantly this is the worst form of un-ethincal hunting... But before we discuss this issue, also discussed later when we talk about ethics, let us first discuss how to hunt from a hide.
|
Now, back to the ethical thing. One way to measure the level of "fair chase" in a hunting technique, is to count the number of animals taken with this technique, per hour spent doing it. From my personal experience I have been more succesfull (animals shot per hour) with rifle on foot, LESS with bow in hide, and least with bow on foot. So although there isn't a "chaise" involved, there is a "wait" involved... The right animal must approach the hide close enough, it must stand still, and in a huntable posture, with no obstructions.
|
| Further Reading: Herman Brand, AB&A, Apr 2007, p31, "Jag uit 'n Skuiling" Pieter Oberholzer, AB&A, Sep 2007, p49, "Die Onderskatter Boonstoel" |
4.3 Hunting Fish
| Further Reading: Herman Brand, AB%A, Oct 2006, p50, "Visskietseisoen is hier" Cleve Cheney, AB%A, Dec 2006, p8, "Bowhunting Fish" Herman Brand, AB&A, Dec 2006, p50, "Voorreg om vis te skiet" |
4.4 Hunting Birds
4.5 Snakes and Snakebite
The first rule about handling snakes is - keep out of there way. They are more afraid of you than you of them. And in general they will flee, or freeze. Only if you are really on them, stepping or otherwise, will they defend themselves in the only way you can, if you only have teeth... |
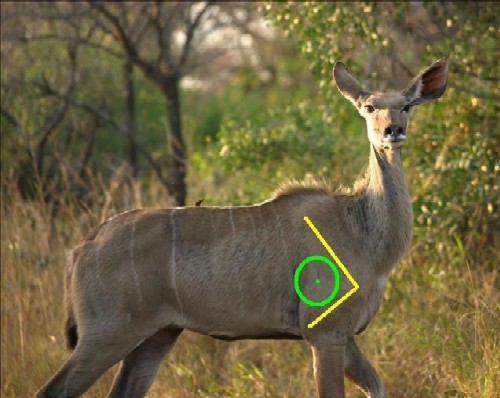
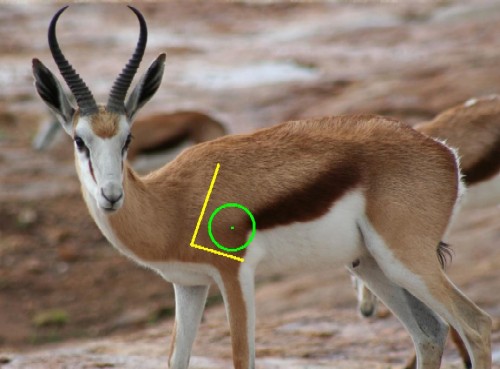
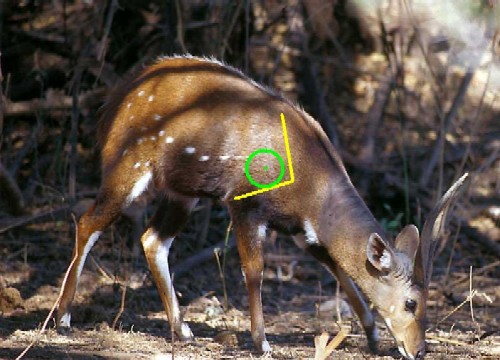
4.6 A Primer on Shot Placement
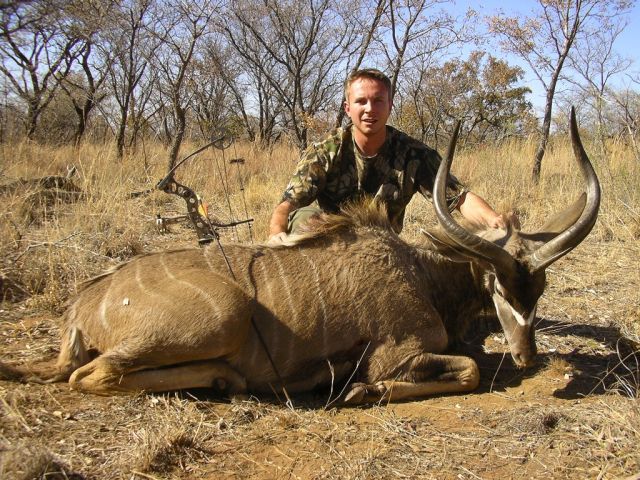
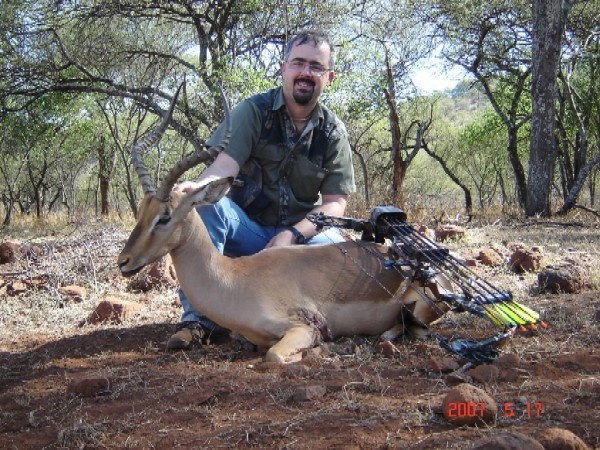
The animal always comes FIRST. A picture of you and a successfully bow hunted animal, capture what this book is all about. With the hunter in the background and the hunted quarry in front, the picture advocates to the world the essence of the skill of bow hunting in its truest form. The world looking at your picture sees the animal in the foreground FIRST and the hunter in the background.
|
|
|
|
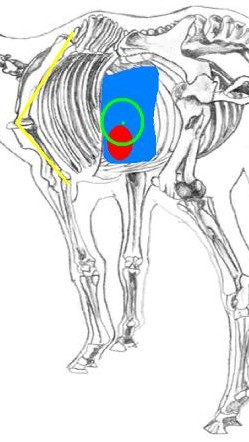
In the above example, many hunters advocate to shoot for the furthest leg, which is still acceptable. It is slightly risky in that if you pull to the right, you may only hit one lung. |
|
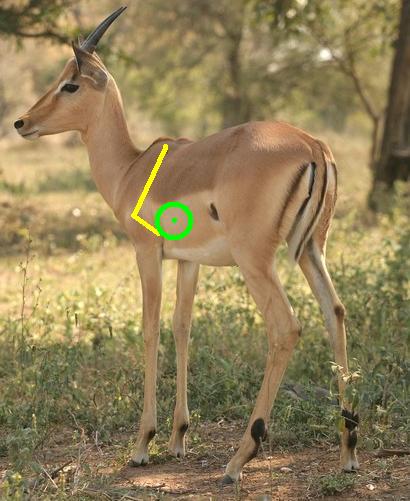
|
|
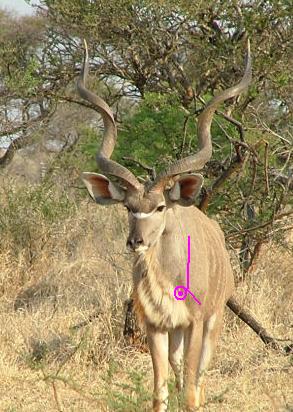
The animal is also looking at you, already making it risky. And if the animals should jump at all at the bow sound, remember the small shot window, you missed it. Therefore it is not recommended at all. |
|
|
|
|
4.6.1 ...from the inside
Here is an interesting perspective on vital area diameters. These animals were frozen and cut into half. This provides us with the position and size if vitals organs. Just as animals differ on the outside, the precise position and form of the internal organs also shows some variation. |
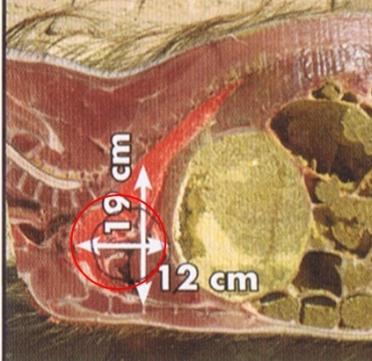 |
Warthogs are notorious for their toughness, and speed. |
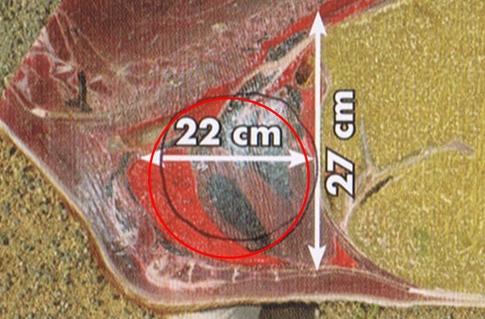
 |
Here we look at a Springbuck. Its vital area is about 5.5" at its narrowest. |
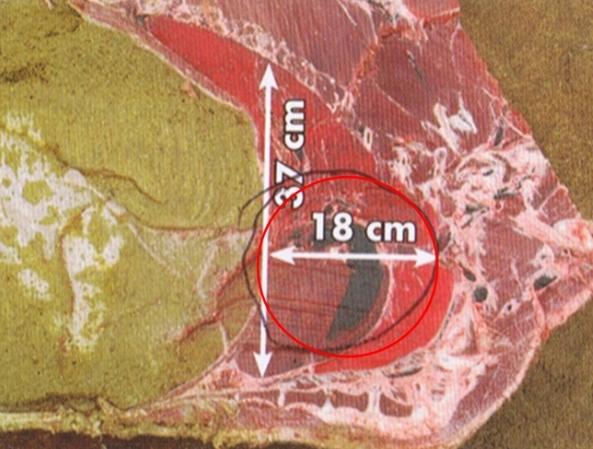
 |
Blesbuck, with a vital area diameter of 8.5" |
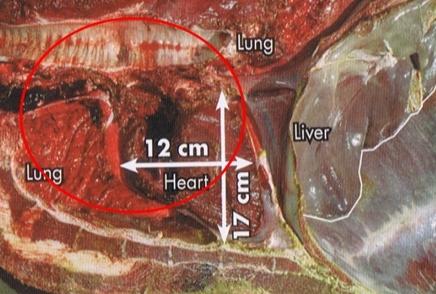
 |
Blue wildebeest, with a surprising 7". This is smaller than expected. |
 |
And here we have a kudu, also about 7". |
Although these are interesting studies, one photo does not represent a specie. We do not know the age of these animals, nor does the exact cut through them looks like it cut throught the middle. |
| Further Reading: Cleve Cheney, AB&A, Mar 2008, p8, "In the Zone" Willie Oosthuizen, AB&A, Jul 2007, p17, "Shot placement for trophy purposes" David Guthrie, AB&A, Jan 2007, p10, "The G-Shot" |
4.6.2 Accuracy
The first thing about accuracy is arrow weight. You can ask the question, how close do my arrows need to be matched for weight, to shoot within 0.5 inches of each other? Here is a simple equation with which to calculate this:
dW = 2.(m+100).H.V2/(S2g). |
|
In general, when increasing the blade area, fletching area should also be increased. Some hunters suggest to use even 4x 5" fletches on 4 bladed broadhead. Of course, the better the bow is tuned, i.e. the straighter the arrow leaves the bow, and the quicker it stabilizes, the better the grouping you will get with broadheads. Lighter arrows also stabilize more quickly than heavier ones. |
|
If you find that the grouping does not change, but the broadhead shoots consistently off target,the problem can usually be corrected with bow tuning. |
| Further Reading: Sampie Stofberg, AB&A, Mar 2009, p42, "Wanneer om te skiet" Herman Brand, AB&A, Nov 2008, p57, "Stop en Verbeter" Sampie Stoffberg, AB&A, Nov 2008, p57, "Jaagskote in die Jagveld" Seppie Celliers, AB&A, Mar 2008, p54, "Maklike oefen tegnieke om gou beter te skiet" John Dudley, AB&A, Jan 2008, p15, "Curing buck fever and target panic" Seppie Celliers, AB&A, Oct 2006, p51, "Hoe kan ek beter skiet? (Part 1)" Seppie Celliers, AB&A, Nov 2006, p50, "Hoe kan ek beter skiet? (Part 2)" Seppie Celliers, AB&A, Dec 2006, p49, "Hoe kan ek beter skiet? (Part 3)" Johan Smit, AB&A, May 2007, p30, "Oorkom plukskiet" John Dudley, AB&A, Sep 2007, p38, "Maximizing you hunting accuracy" John Dudley, AB&A, Oct 2007, p25, "Shooting Accurate Constantly" |
4.6.3 Estimating Ranges
Although it is highly recommended to use a rangefinder, the following techniques may come in handy if the battery goes down, or the device fails... Always bear in mind that you can for any technique simply divide the distance into two, and estimate the nearest half�s. Double it then for the whole distance. |
4.6.3.1 Ground Distance estimation
Learn to estimate a particular distance, say 10y, on the ground, towards the target. The technique is then simply to count how many times it fits into the total distance. You can also estimate multiples of 10 and then 20 yards, etc., and get the average. |
4.6.3.2 Angle Cards
These cards are marked with the apparent height of 1m at various distance intervals, when the card is viewed at a particular distance. |
4.6.3.3 Using your Thumb
This technique inverts the "angle cards" idea. Instead of comparing the apparent height with various pre-marked heights, we use the number of times a known/estimated distance at the target�s position, fits into a single pre-marked distance. |
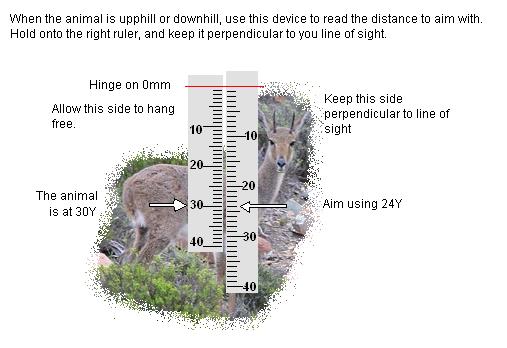
4.6.3.4 Using a Ruler
Basically the same technique as the thumb idea above, but with the ruler you can impress more suckers, wink-wink. |
You could of course use anything with at least 10" marked on it (an arrow comes to mind). |
4.6.3.5 Measured apparent size at 10m or 10y
Another adaptation to the above technique is possible when shooting 2D targets, since they are printed on the same size paper! Walk up to 10yd away from the target, and hold up your bow at shooting length. The target will fill a certain width and height inside the sight, or on the riser. Make a mental note thereof. |
4.6.3.6 Known size / 100
There are two variations of this technique. They are very similar to the previous ones, but with slightly different accents, and can come in handy to cross check each other. These techniques also start with a known or estimated target size. But instead of using a fixed width a particular distance, use 1/100 of the target�s size. |
Disadvantages |
4.6.3.7 Parallax
This is an easy technique. Take a pencil, or even a sight�s pin, or field point. |
4.7 Camouflage
|
Any movement is very easily seen by all animals.When moving in the field, do it as slow as possible. When very close to your target, try to move only parts of your body at a time. It is of such importance that the lack of any movement becomes an ambush - which is so effective that some hunters feel it's not ethical! The best pattern that hides movement is no pattern at all. A single natural colour or a large low contrast pattern with blurred edges works better for a moving hunter. Smaller sharp edged, high contrast patterns work best for an ambush hunter. |
The silhouette defines your outline, or shape. Another aim of camouflage should be to break the hunter's shape. The use of high contrast on edges, as seen from a particular direction, is most effective. However, the moment you move, they become more visible. |
Never confuse camouflage for combat, with that for hunting. Although they can look similar, never judge them with a human eye. Check the patterns at 100 to 10Y. It should stay blotchy and fragmented, and never become a blob of a single colour. |
As a last word on camouflage, the best all purpose everywhere camouflage makes you look like something very well known, totally benign, and that's everywhere - a rock. If you walk through the field, how much attention do you apply to rocks? You are always looking at bushes, what's in them, behind them, and as for rocks, at most what's behind them. |
4.8 Waiting Times
|
|
4.9 Following a spoor
There are long and beautiful stories of trackers, and how with the faintest of evidences, they can tell you not only where the animal went, but the particular type, male/female, age, temperament, and of course, where they headed. If only we could write down the skill ... |
|
Blood when dried becomes brown. Small spots of blood dry within a minute of two in the hot sun. So you should be looking for brown and red. The blood normally is more smeared against the grasses and bushes as the animal walks, unless of course the bleeding is profuse. The blood gets caught up in the hair much like paint in a paint brush. |
Watery blood, with stomach contents is a bad sign - indicative of a gut shot. It IS going to be a long trek.If the whole arrow has blood on, it�s usually a sure sign of a pass through, and usually a good blood spoor. Antelope and dog blood clots on the ground generally within minutes, while pig blood clots in 3.5 minutes and equine blood (horses, zebras) in 11.5 minutes. |
|
|
| Further Reading: Cleve Cheney, AB, Nov/Dec 2000, p23, "Principles of Tracking - Part 2" Cleve Cheney, AB, Jan/Feb 2001, p17, "Principles of Tracking: Interpreting Sing - blood trailing - Part 3" Cleve Cheney, AB, Mar/Apr 2001, p18, "Principles of Tracking: Interpreting Sing - identification of tracks (mammals) - Part 4" Cleve Cheney, AB&A, Mar 2008, p74, "A Tracking Notebook" Cleve Cheney, AB&A, Feb 2008, p66, "Tracking by sound" Cleve Cheney, AB&A, Jan 2008, p74, "Mud Tracking" Cleve Cheney, AB&A, Nov 2007, p74, "Following a blood trail (Part1)" Cleve Cheney, AB&A, Dec 2007, p74, "Following a blood trail (Part2)" Cleve Cheney, AB&A, Oct 2007, p74, "Tracking: ageing sign - scats" |
4.10 Caping
4.11 Ethics
There are much written about ethics, and SABA will not say the last word on it. But we (SABA) want to start a process wherewith the bowhunting community can develop a mature and complete education on all aspects of bowhunting, ethics included. |
Therefore neither SABA nor probably anybody else can define "a fair chase". A really fair chase is probably only when you have to run down your quarry, and bite it to death. |
|
If we all can accept these points, we need not have any argument on ethics. Anything that is not solved by referring back to these principles, becomes opinions, and is subjective, and most probably will change in time and among cultures as well. Then a "fair chase" lies outside the scope of ethics, and becomes one of opinion.
Rean Steenkamp, editor of the African Bowhunter and Archer, has the following to say:
This illustrates the difference between ethics, opinion and a fair chase. The most important implication of these principles is that you have to shoot accurately, not with marginal or inferior equipment, and only if a safe and sure shot is available. This applies to ALL types of hunting. |
|
On these last rules: SABA supports the very old and universal rule, if you draw blood, you pay. There is no responsibility on the farmer�s side, or the PH, or the manager, to find the animal you shot. It was your decision to hunt there, and you must have inquired on the policy of the farmer, if they have good trackers, perhaps trained dogs, etc. If you shoot and there is blood on the scene, you must pay. Likewise if the carcass is only found the next day and there is not much left. It is the right of the farmer to refuse you any further hunting or even access to his land, if you do not follow this rule. Likewise, if you feel you were not treated well, it is your right to hunt elsewhere. And if you want to shoot an Oryx and the guide/PH or whoever is with you, say go, and it�s a sable antelope, you pay. If you respect these people, their animals and their rules, they will make it their responsibility to find your trophy. |
|
SABA requires as part of their proficiency program, for hunters to actively practice and partake in competitions. |
g) A female animal (cow, ewe or sow) is with dependent young. |
The target in the case of the spinal cord and brain is also protected by strong bones, creating a probability of not penetrating deep enough. In these cases where the animal was not killed it would lead to a wound. Therefore even though the shots would be perfectly effective, they are unethical as the chance of violating the death principle is too big. |
|
One of the biggest issues we just touched is marginal equipment. This subject is however so large, that it fills almost a whole proficiency program. |
4.12 Conclusion
Please take note that although these recommendations are based on hunting experiences, it does not guarantee a successful hunt. It also follows that it is possible to hunt successful, although usually not lawful/ethical, by not adhering to them. Currently the law prescribes some equipment requirements, but makes no mention of the archer's abilities. The equipment provides penetration, while the archer provides accuracy, and it is on this point that we base our recommendations. |
|
4.13 Some miscellaneous reading
| Further Reading: Engee Potgieter, AB&A, Aug 2007, p39, "Take better trophy photos" Cleve Cheney, AB&A, Oct 2007, p15, "Building blinds for bowhunting" Louis Stoffberg, AB&A, Jun 2008, p55, "Bou 'n Gawe Skuiling" Harry Marx, AB&A, Jan 2009, p11, "The cheapest chronograph yet" Harry Marx, AB&A, Dec 2007, p19, "A 'cheap' Chronograph" Cleve Cheney, AB&A, Jun 2008, p20, "Bushcraft: Fire" |
5 Species
5.1 Species Categories
The use of species categories are no longer promoted, and instead we propose simply to work on the animal's mass. This allows for "relaxing" the requirements for young animals without worrying about arbitrary category borders.
However, as we introduced the effect of the broadhead into the requirements since the last edition, we will here provide tables for various broadheads. These tables are also available on the web at http://www.bowhunting.co.za/SABA/asp/minreq.asp |
The first table is for four bladed chisel point tips: |
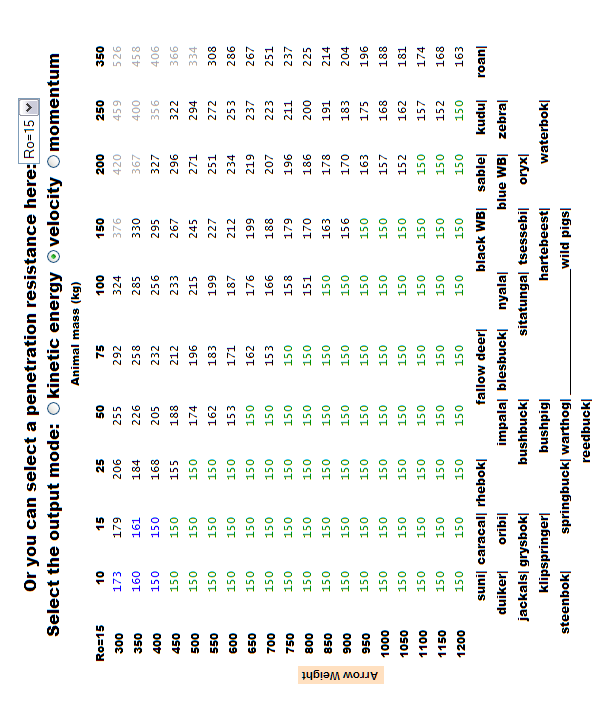
The next table is for three-bladed mechanicals. On a personal note, I will NEVER use a mechanical on a buffalo. Please, do not try doing so. There overlapping ribs WILL brake the broadhead, and that will cause sever penetration issues. |
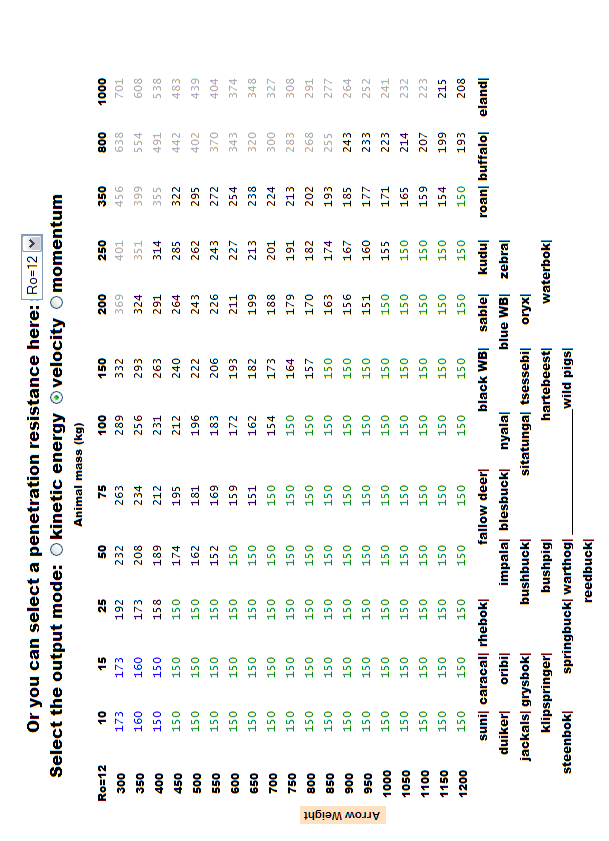
Here we see a fairly standard three blader cut on contact tip, with a typical resistance of 8 lbs. |
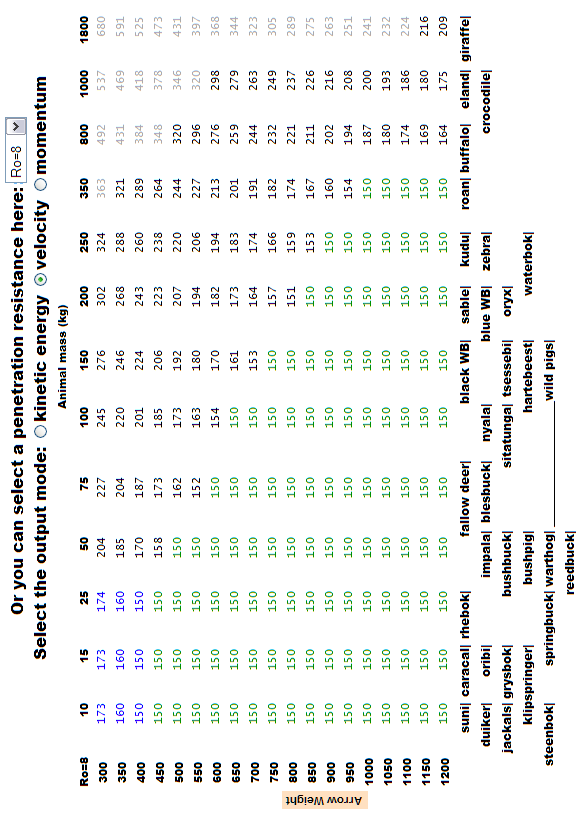
The last table is for a two blader, typically used for bigger animals. The huge effect of the broadhead can be seen when comparing this table to the first one. |
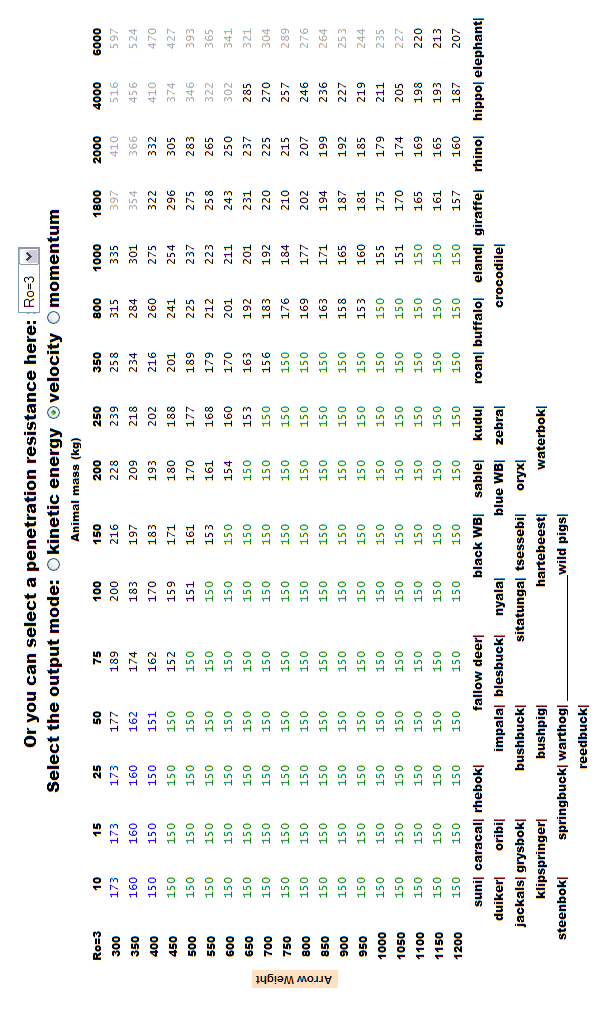
Rean Steenkamp, former chairman of the Traditional Archers of South Africa, and editor of Africa's Bowhunter magazine, hunts with traditional equipment. Elsewhere we note how the model predicts certain minimum requirments, and how it is confirmed by among others, these results. You can compare his results with the last table provided above. |
BH DW mass speed MA KE Dp Animal tree shark 46 460 150 23 8" impala zwickey " " " " full+bones " snuffers " " " " 8"+ bones " tree shark 58 620 150 13 31 BWB " 46 620 156 14 34 " " " " " " 30"+ impala Q-away zwickey delta " " " " full 2x " " " " " full warthog " 50 " " " full 5x kudu bulls + BWB |
Hunting tips for animals <200kg should have a point with blade heights of at least � 0.35" (9mm)(cutting diameter 1"). |
5.2 Legislation Hunting Licences and Permits - South Africa 2014/2015
Thank you Nico Groen for providing this for us - just reading legal documents is already a difficult venture, and he made a good job of summarising it for us. |
|
|
|
|
|
This summary gives an overview of the hunting regulations and legislation in the
various provinces in South Africa. IGNORANCE IS NO EXCUSE � If your hunt is not legal you are POACHING!!!!! |
Each of the nine provinces has its own hunting regulations. Therefore, it is
important that hunters know what these regulations entail and ensure that they
comply accordingly before they hunt. In Gauteng, Northwest, Mpumalanga and
Limpopo hunters may hunt on an exempted farm without a licence, but they
must have a permit from the landowner that gives them permission to hunt. On
open farms, hunters must have both a hunting licence and a permit.
In the other five provinces, hunters must always have a hunting licence.
The landowner and his �family� might be exempted from provincial hunting
licences. |
5.2.1 Provinces
5.2.1.1 GAUTENG
Exempted farms: see rules for Limpopo Province. |
5.2.1.2 NORTHWEST
Exempted farms: See rules for Limpopo Province. |
5.2.1.3 LIMPOPO
Exempted farms: The hunter does not need a hunting licence. He/She should
obtain written permission from the landowner to hunt and take this permission
letter with him/her on the hunting trip. |
2012 examples of permits and prices
|
5.2.1.4 MPUMALANGA
Exempted farms: Same as for Limpopo |
VENUE       PERSON          TELEPHONE           FAX NO
Loskopdam   Isak Aphane     013 262 4184/4190   013 262 2762
Ermelo      Johan Coetzer   017 819 2827        017 811 4800
            Boy Dladla      083 627 0991
Middelburg  B Nkosi         013 282 8671        013 282 8674
Lydenburg   Jannie de Bruyn 013 235 2395        013 235 2571
Nelspruit                   013 759 5386        013 759 5490
Komatipoort & Malelane
			Sam Malindisa   083 626 6319
|
NB: daily bag limits apply for licences to hunt game birds |
5.2.1.5 FREE STATE
Hunting licences are valid from day of purchase until 31 December of the same
year. A hunting licence costs in the region of R50,00 for ordinary game. A permit
for hunting protected game costs �R200,00. The validity is the same as for an
ordinary licence described above. An additional permit to hunt outside the
specified hunting season costs R100,00. |
REGION/DISTRICT CONTACT PERSON TEL NO FAX NO Bloemfontein Diana Nel 051 400 9527 051 400 9523 Sandveld Nature Rsrv A v/d Westhuizen 053 433 1703 053 433 1703 Koppies Dam Nature Rsvr JJ Joubert 056 777 2034 056 722 522 Willem Pretorius Game R D Erasmus 057 651 4003 057 651 4005 Soetdoring Nat Rsvr M Mohale 051 433 9002 051 433 9002 Erfenis Dam Nat Rsrv R Lotz 057 724 2111 057 733 2125 |
Rustfontein Dam N-Rsrv J van Rensburg 051 528 2924 051 526 2970 Kalkfontein Dam N-Rsrv A Winkel 051 722 1441 051 722 1441 Gariep Dam NatRes H Bosman 051 754 0026 051 754 0045 Tussen-die-Riviere NR F van den Berg 051 763 1000 051 763 1114 Caledon Nat Res D Hayter 051 583 1920 051 583 2000 Sterkfontein Dam NR M Roods 058 622 3520 058 622 1772 Seekoeivlei Nat Res G Wandrag 058 924 0183 058 924 0183 Bathurst Nature Rsrv K Claus 051 442 7080 051 442 2109 Enquiries: Diana Nel at tel. 051 400 9527 |
5.2.1.6 KWAZULU-NATAL
Hunting licences for ordinary game (impala, bushbuck ram & duiker) is usually
valid from 31 May to 31 August annually and costs in the region of R8,00 per
licence. |
5.2.1.7 NORTHERN CAPE
Hunting licences are compulsory for all hunting activities without any restrictions
on numbers and species. The licence cost R150,00 and is valid for one year.
Hunters must apply personally and must produce their identification documents
when purchasing licences. |
5.2.1.8 EASTERN CAPE
Hunting licences are valid for exactly one year from the day of purchase. Certain
species may be hunted during the hunting season only.
Enquiries: Eastern Cape Nature Conservation at tel.(040) 609 2307.
All hunters must be in possession of general hunting licences to hunt in the
Eastern Cape Province. This licence is also valid for bird hunting, and is available
from most firearm dealers. |
CITY/TOWN TEL NO East London 043 742 0340 Bisho 040 609 2307 |
5.2.1.9 WESTERN CAPE
Hunters must be in possession of a general hunting licence, which is available at
agencies such as firearm-dealers and other offices of Cape Nature Conservation
for approximately R170,00. |
TOWN/CITY CONTACT TEL NO George 044 802 5300 Porterville 022 931 2900 Robertson 023 625 1621 Onrus 028 314 0062 Cape Town 021 483 0000 / 659 3418 Oudtshoorn 044 203 6300 |
5.2.2 Protected Animals
Examples of protected animals list as per Limpopo Ordinance: |
5.2.2.1 SCHEDULE 2
SPECIALLY PROTECTED WILD ANIMALS Mammals COMMON NAME SCIENTIFIC NAME African elephant Loxodonta africana Ant bear Orycteropus afer Black footed cat Felis nigripes Lichtenstein�s hartebeest Alcelaphus lichtensteinii Pangolin Manis temmincki Red duiker Cephalophus natalensis Rhinoceros, Black Diceros bicornis Rhinoceros, White Ceratotherium simum Roan antelope Hippotragus equinus Sharpe�s grysbok Raphicerus sharpei Suni Neotragus moschatus Wild dog Lycaon pictus Birds (Just a few of the bigger species are listed here) COMMON NAME SCIENTIFIC NAME Barred Owl Glaucidium capens Bat hawk Macheirhamphus alcinus Bateleur Terathopius ecaudatus Blue crane Tetrapteryx paradisea Bustard, Kori Ardeotis kori Bustard, Stanley�s Neotis denhami Crested guineafowl Guttera edouardi Eagle- Tawny Aquila rapax Grass Owl Tyto capensis Ground hornbill Bucorvus leadbeateri Martial eagle Polema�tus bellicosus Pel�s fishing owl Scotopelia peli Saddlebill stork Ephippiorhynchus senegalensis Vulture (all) Whitebacked Night Heron Gorsachius leuconotus Whitebellied Korhaan Eupodotis cafra Whitecrowned Plover Vanellus albiceps Yellow-billed Oxpecker Buphagus africanus Yellow-throated Sandgrouse Pterocles gutturalis Reptiles COMMON NAME SCIENTIFIC NAME Nile crocodile Crocodylus niloticus |
|
5.2.2.2 SCHEDULE 3
PROTECTED WILD ANIMALS Mammals COMMON NAME SCIENTIFIC NAME Aardwolf Proteles cristatus African civet Civettictis civetta African wild cat Felis silvestris lybica Buffalo Syncerus caffer Bushbaby Galago crassicaudatus Bushbaby, Lesser Galago senegalensis Cape clawless otter Aonyx capensis Cheetah Acinonyx jubatus Fox, Bat-eared Otocyon megalotis Fox, Cape Vulpes chama Giraffe Giraffa camelopardalis Hedgehog Atelerix frontalis |
Hippopotamus Hippopotamus amphibius Honey badger Mellivora capensis Hyaena, Brown Parahyaena brunnea Hyaena, Spotted Crocuta crocuta Jameson�s red rock rabbit Pronolagus randensis Klipspringer Oreotragus oreotragus Leopard Panthera pardus Lion Panthera leo Mongoose, Mellers�s Rhynchogale melleri Mongoose, Selous Paracynictis selousi selousi Oribi Ourebia ourebia Reedbuck, Common Redunca arundinum Reedbuck, Mountain Redunca fulvorufula Rhebuck, Grey Pelea capreolus Sable antelope Hippotragus niger Samango monkey Cercopithecus mitis Serval Laptailurus serval Side-striped Jackal Canis adustus Steenbok Raphicerus campestris Tsessebe Damaliscus lunatus Yellow-spotted rock dassie Heterohyrax brucei Birds Any bird which is a wild animal excluding i) a bird which is a specially protected wild animal; ii) a bird which is game; and iii) the following species: COMMON NAME SCIENTIFIC NAME All species of mousebirds Family Coliidae Black-eyed bulbul Pycnonotus barbatus Cape sparrow Passer melanurus Crow, Black Corvus capensis Crow, Pied Corvus albus Dove, Cape turtle Streptopelia capicola Dove, Laughing Streptopelia senegalensis Dove, Red-eyed turtle Streptopelia semitorquata Ostrich Struthio camelus Red-billed quelea Quelea quelea Red-winged starling Onychognathus morio Weaver, Cape Ploceus capensis Weaver, Masked Ploceus velatus Weaver, Spotted-backed Ploceus cucullatus Reptiles and amphibians COMMON NAME SCIENTIFIC NAME Bullfrog Pyxicephalus adspersus File snake, Black Mehelya nyassae File snake, Cape Mehelya capensis Python Python sebae |
All other species of reptiles excluding; All species of the Class Reptilia; water monitor, rock monitor, and all excluding Varanus niloticus, indigenous snakes not listed in this Varanus albigularis and all species Schedule. of the Sub Order Serpentes, except Phython sebae, Mehelya capensis and Mehylya nyassae. |
5.2.2.3 SCHEDULE 4
GAME Mammals COMMON NAME SCIENTIFIC NAME Blue wildebeest Connochaetes taurinus Burchell�s zebra Equus burchelli Bushbuck Tragelaphus scriptus Caracal Caracal caracal Chacma baboon Papio hamadryas ursinus |
Eland Tragelaphus oryx Gemsbok Oryx gazella Grey duiker Sylvicapra grimmia Hare, cape Lepus capensis Hare, scrub Lepus saxatilis Impala Aepyceros melampus Kudu Tragelaphus strepsiceros Nyala Tragelaphus angasi Red Hartebeest Alcelaphus buselaphus Springbok Antidorcas marsupialis Vervet monkey Chlorocebus aethiops Waterbuck Kobus ellipsiprymnus Birds COMMON NAME SCIENTIFIC NAME Duck, White faced whistling Dendrocygna viduata Duck, Yellow billed Anas undulata Francolin, Crested Francolinus sephaena Francolin, Natal Francolinus natalensis Francolin, Red-wing Francolinus levailantii Francolin, Shelley�s Francolinus shellyi Francolin, Swainson�s Pternistis swainsoni Goose, Egyptian Alpochen aegyptiacus Goose, Spur-winged Plectropterus gambensis Helmeted guinea fowl Numida meleagris Red billed teal Anas erythrorhyncha Red knobbed coot Fulica cristata Rock pigeon Columba guinea |
5.2.2.4 SCHEDULE 5
WILD ANIMALS TO WHICH SECTION 31(1)(f) APPLIES
�31. (1) No person may without a permit hunt �
(a) specially protected wild animals;
(b) protected wild animals;
(c) game;
(d) specially protected wild animals, protected wild animals,
game and nonindigenous wild animals during the night;
(e) in a Provincial Nature Reserve, a Site of Ecological
Importance, a Protected Environment or a Private Nature
Reserve; or
(f) a wild animal referred to in Schedule 5 which �
(i) is under the influence of a tranquillising, narcotic,
immobilising or similar agent;
(ii) has been lured by �
(aa) a simulation or recording of the natural sound made by an animal;
(bb) an imitating sound made by a human; or
(cc) bait;
(iii) has been confined to a cage; or�.�
(iv) has been confined to an enclosure, the size of which must be
prescribed, from which it cannot readily escape.
COMMON NAME SCIENTIFIC NAME
Cheetah Acinonyx jubatus
Hyaena, Brown Parahyaena brunnea
Hyaena, Spotted Crocuta crocuta
Leopard Panthera pardus
Lion Panthera leo
Wild dog Lycaon pictus
|
5.2.2.5 SCHEDULE 6
NON-INDIGENOUS WILD ANIMALS COMMON NAME SCIENTIFIC NAME Black wildebeest Connochaetus gnou Blesbuck Damaliscus pygargus phillipsi Blue duiker Philantomba monticola Bontebok Damaliscus pygargus dorcas Greysbok Raphicerus melanotis Mountain zebra Equus zebra (b) All mutations, cross-breeds, improved, alien colour variations, genetic variations and genetically modified specimens of any wild animal. |
5.3 Common species
|
|
In general the temperament can be compared to reaction times, and the following is suggested:
|
See the table on maximum distances based on reaction times for the effect this should have on your shooting. Temperament should override any other species or accuracy concerns. |
5.3.1 Black Wildebeest (Connochaetes gnou)
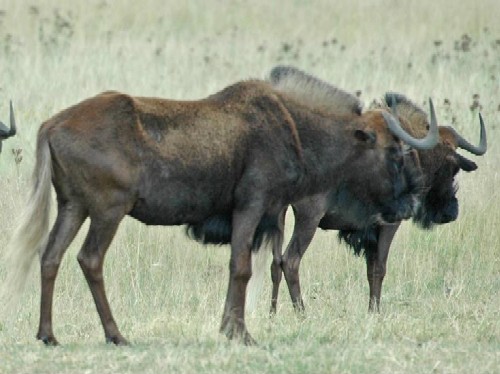
|
 |
| Further Reading: Engee Potgieter, AB&A, Jan 2008, p27, "Black Wildebeest:Icon of the open plains" |
5.3.2 Blesbuck (Damaliscus dorcas phillipsi)
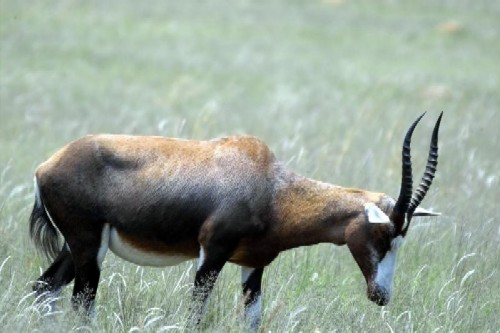
Average Mass: 60-80, 53, 32-44 Temperament: Cautious Average Shoulder Height: 95cm (37") Rowland Ward: 41.91cm (16 1/2") max 20 5/8" SCI: 39 Points max 54 7/8 Track: 64mm (2 1/2") x 45mm (1 3/4") Min Equipment: 350gr @ 250fps, Ro<16 |  |
5.3.3 Blue Wildebeest (Connochaetes taurinus taurinus)
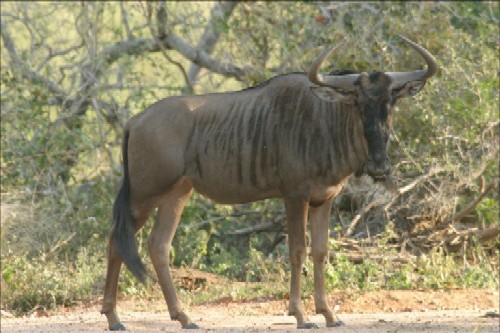
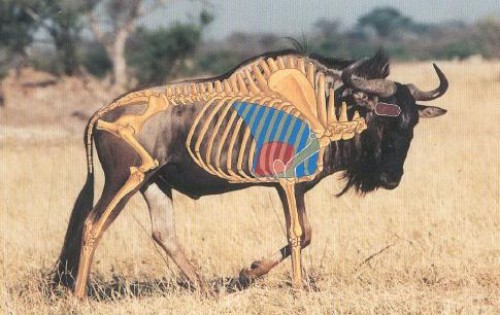
Average Mass: 215-250, 58, 125-145 Temperament: Reasonably calm Average Shoulder Height: F:135cm M:150cm Rowland Ward: 72.39 cm (28 1/2") max 33 7/8 SCI: 70 Points max 94 3/4 Track: 86mm (3 3/8") x 61mm (2 3/8") Min Equipment: 550gr @ 250fps, Ro<12 | |
| Further Reading: Cleve Cheney, AB, Jan/Feb 2001, p8, "Bowhunting Blue Wildebeest" Cleve Cheney, AB&A, Jun 2008, p8, "Hunting Blue Wildebeest" Jerry Pilling, AB&A, Jun 2008, p12, "Waiting for a wildebeest" |
5.3.4 Buffalo (Syncerus caffer caffer)

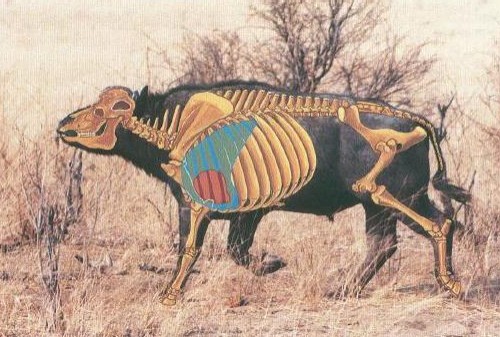
    Average Mass:   680-820, 50, 340-410
    Temperament: Reasonably calm
    Average Shoulder Height: 170 cm (67")
    Rowland Ward:   114.30 cm (45")
    SCI:    100 Points
    Track: 152mm (6") x 152mm (6")
    Min Equipment: 800 gr @ 220, 900gr @ 215fps, Ro<8
| 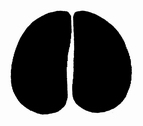 |
| Further Reading: Piet Lombard, AB&A, Apr 2007, p9, "Buffalo hunt on the run" |
5.3.5 Bush Buck (Tragelaphus scriptus sylvaticus)
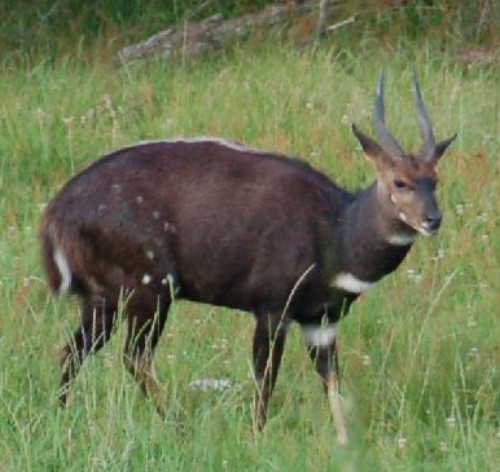
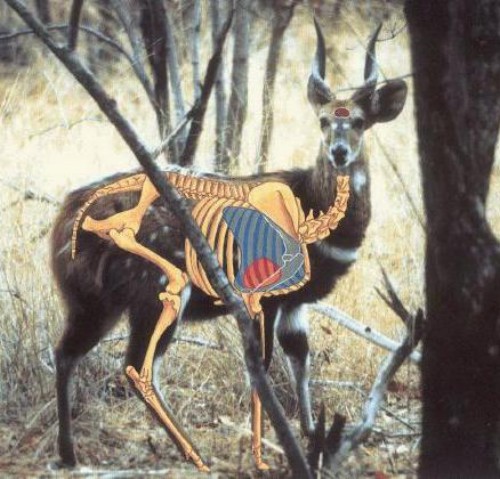
    Average Mass:   63-73, 55, 35-40
    Temperament: nervous
    Average Shoulder Height: 80 cm (31")
    Rowland Ward:   38.10 cm (15")
    SCI:    31 Points
    Track: 41mm (1 5/8") x 25mm (1")
    Equipment: 350gr @ 250fps, Ro<12
| 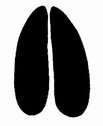 |
| Further Reading: Cleve Cheney, AB&A, Jul 2008, p8 |
5.3.6 Bushpig (Potamochoerus porcus)
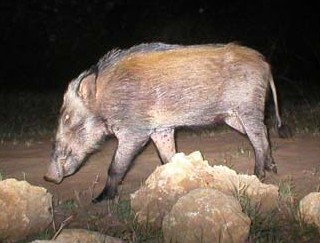
    Average Mass:   65
    Temperament: nervous
    Average Shoulder Height:  75 cm (30")
    Rowland Ward:   13.97 cm (5 1/2")
    SCI:    11 Points
    Track: 41mm (1 5/8") x 38mm (1 1/2")
    Equipment: 400gr @ 250fps, Ro<10
| 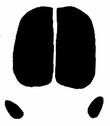 |
| Further Reading: Engee Potgieter, AB&A, Oct 2008, p28 Cleve Cheney, AB&A, Dec 2007, p8, "Hunting the Feral Pig" Adrian de Villiers, AB&A, Dec 2007, p27, "Bowhunting Feral Pigs" |
5.3.7 Caracal(rooikat) (Caracal caracal)
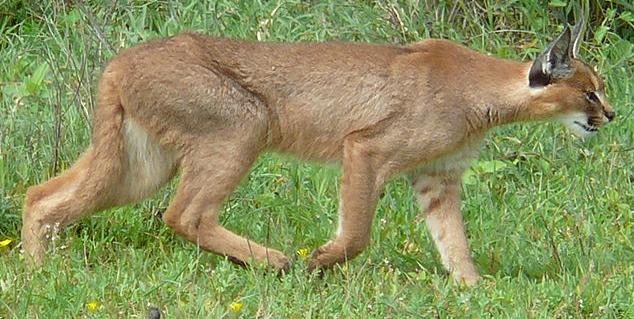
    Average Mass:   7 - 19 kg
    Temperament: nervous
    Average Shoulder Height: 40 - 45 cm (17")
    Rowland Ward:  19.05 cm (7 1/2")
    SCI:  6 Points
    Track:  51 x 51 mm(2")
    Equipment: 350gr @ 250fps, Ro<12
|  |
5.3.8 Cheetah (Acinonyx jubatus)
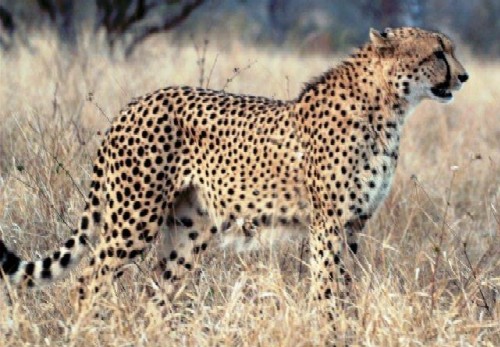
    Average Mass:   63
    Temperament: nervous
    Average Shoulder Height: 86 cm (34")
    Rowland Ward:   31.44 cm (12 3/8")
    SCI:    12 Points
    Track: 105mm (4 1/8") x 86mm (3 3/8")
    Equipment: 400gr @ 250fps, Ro<12
|  |
5.3.9 Crocodile (Crocodilus nilotica)
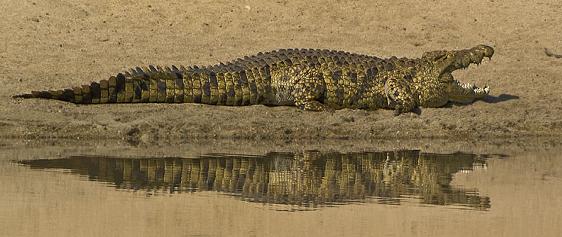
Average Mass: 910 Temperament: Reasonably calm Average length: 5.5m + (18 '+) Rowland Ward: 4.27m (14') length SCI: 2.75 m (9 ') Track: Front: 180mm (4 1/4") x 150mm (4 1/4") Hind: 180mm (4 1/4") x 150mm (4 1/4") Equipment: 900gr @ 200fps, Ro<10 | 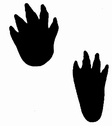 |
5.3.10 Duiker (Cephalophus monticola)
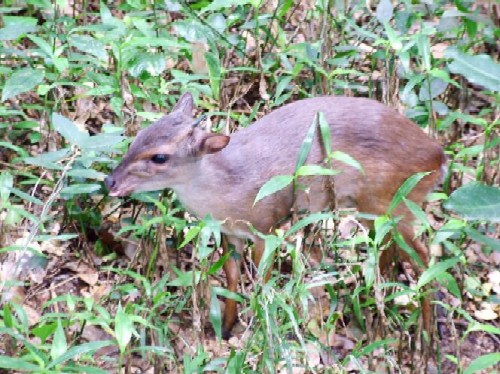

    Average Mass:   10-14, 55, 6-8
    Temperament: Cautious
    Average Shoulder Height: 30 cm (12")
    Rowland Ward:   4.44 cm (1 3/4")
    SCI:    4 Points
    Track: 41mm (1 5/8") x 25mm (1")
    Equipment: 350gr @ 250fps, Ro<12
| 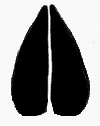 |
| Further Reading: Cleve Cheney, AB&A, Jan 2007, p8, "Hunting the Blue Duiker" Cleve Cheney, AB&A, Nov 2008, p8 |
5.3.11 Eland (Taurotragus oryx livingstonii)
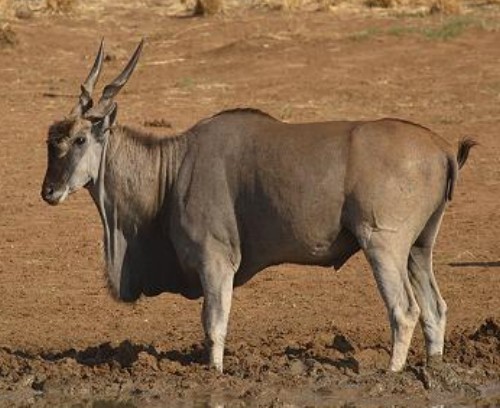
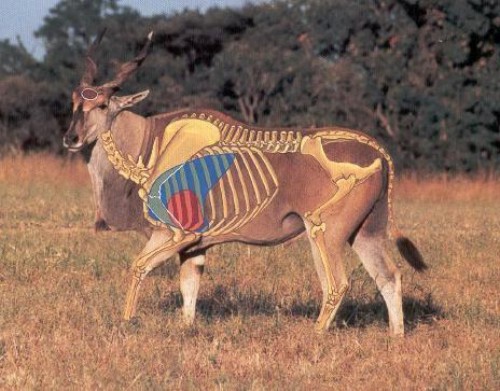
    Average Mass:   460-910, 51, 235-464
    Temperament: Cautious
    Average Shoulder Height: 170 cm (67")
    Rowland Ward:   88.90 cm (35")
    SCI:    77 Points
    Track: 114mm (4 1/2") x 95mm (3 3/4")
    Equipment: 600gr @ 250fps, Ro<10
| 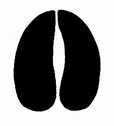 |
| Further Reading: Cleve Cheney, AB&A, Oct 2008, p8 Anthony C. Ruggeri, AB&A, Jan 2007, p27, "Eland" |
5.3.12 Elephant (Loxodonta africana)
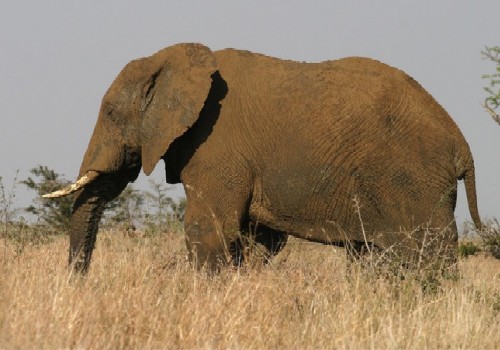
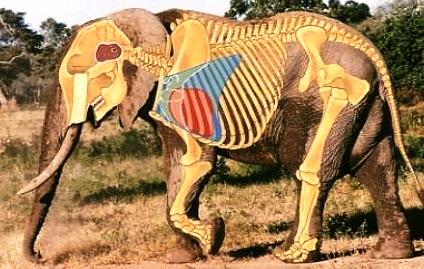
    Average Mass:   5700
    Temperament: Reasonably calm, but can be
    nervous
    Average Shoulder Height: 350cm (138")
    Rowland Ward:  36.36kg (80lb)
    SCI:    100 Points
    Track: 533mm (21") x 483mm (19")
    Equipment: 1200gr @ 200fps, Ro<5
|  |
| Further Reading: Fritz Rabe, AB&A, Oct 2006, p36, "Elephant Bowhunt" Hendrik Von Wielligh, AB&A, Aug 2007, p19, "Musth in Male African Elephants" |
5.3.13 Fallo Deer (Cervus dama dama)
    Average Mass:   68
    Temperament:
    Average Shoulder Height:    91 cm (36")
    Rowland Ward:   64.13 cm (25 1/4")
    SCI:    130 Points
    Track: 73mm (2 7/8") x 44mm (1 3/4 ")
    Equipment: 350gr @ 250fps, Ro<12
|  |
5.3.14 fox (Otocyon megalotis)
    Average Mass:   3 - 4.5kg
    Temperament: shy, nervous
    Average Shoulder Height:    35-40 cm (16")
    Rowland Ward:
    SCI:
    Track:
Equipment: 350gr @ 250fps, Ro<12 |
5.3.15 Gemsbok (Oryx gazella gazella)
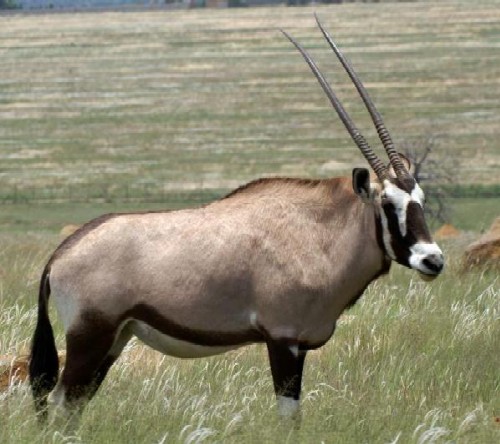
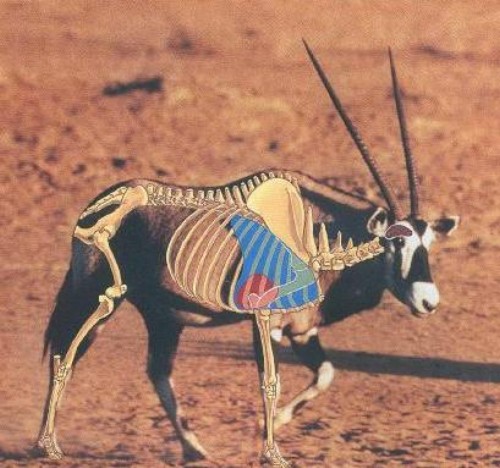
    Average Mass:   180-210, 55, 99-118
    Temperament: Cautious
    Average Shoulder Height:    120 cm (47")
    Rowland Ward:   101.60 cm (40")
    SCI:    88 Points
    Track: 95mm (3 3/4") x 70mm (2 3/4")
    Equipment: 500gr @ 250fps, Ro<10
| |
| Further Reading: Cleve Cheney, AB&A, Aug 2007, p8, "Hunting Gemsbok" |
5.3.16 Giraffe (Giraffa camelopardalis giraffa)
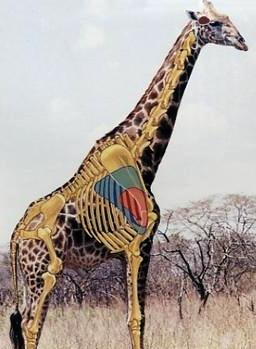
    Average Mass:   600-1400, 55, 330-770
    Temperament: Reasonably calm - Cautious
    Average Shoulder Height:    5 -6 m (16 - 19 ft)
    Rowland Ward:   nc
    SCI:    nc
    Track: 190mm (7") x 150mm (6")
    Equipment: 900gr @ 210fps, Ro<5
| 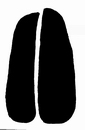 |
| Further Reading: Gideon Van Niekerk, AB&A, Jul 2006, p30, "My Giraffe" |
5.3.17 Grey Rhebok (Palea capreolus)
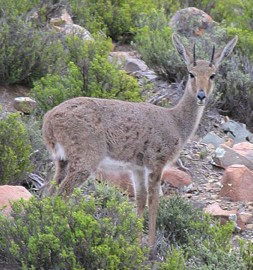
    Average Mass:   25
    Temperament: nervous
    Average Shoulder Height:    81 cm (32")
    Rowland Ward:   20.01 cm (7 7/8 ")
    SCI:    18 Points
    Track: 64mm (2 1/2") x 41mm (1 5/8")
    Equipment: 350gr @ 250fps, Ro<12
| 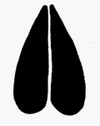 |
5.3.18 Grysbbok (Raphicerus melanotis)
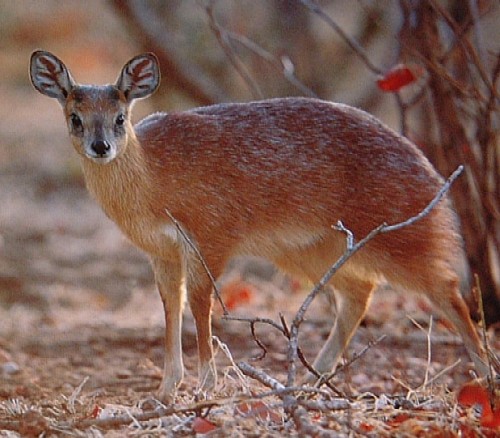
    Average Mass:   8-14, 55, 4-8
    Temperament:
    Average Shoulder Height:    54 cm (21")
    Rowland Ward:   7.62 cm (3")
    SCI:    7 Points
    Track: 32mm (1 3/4") x 19mm (3/4")
    Equipment: 350gr @ 250fps, Ro<12
|  |
| Further Reading: Cleve Cheney, AB&A, Nov 2006, p8, "Hunting Cape Grysbok" Engee Potgieter, AB&A, Nov 2006, p25, "Bowhunting the Cape Grysbok" |
5.3.19 Hartebees (Alcelaphus buselaphus)
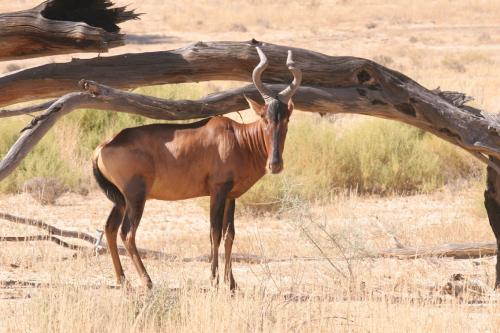
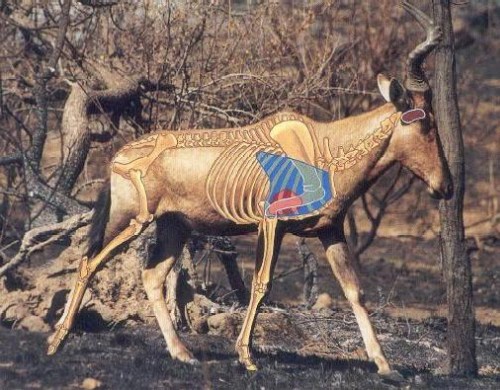
    Average Mass:   160-182, 55, 88-100
    Temperament: Cautious
    Average Shoulder Height:    124 cm (49")
    Rowland Ward:   58.42 cm (23")
    SCI:    62 Points
    Track: 98mm (3 7/8") x 67mm (2 5/8")
    Equipment: 450gr @ 250fps, Ro<12
| |
| Further Reading: Cleve Cheney, AB&A, Aug 2008, p8 (Red) Cleve Cheney, AB&A, Mar 2007, p8, "Hunting Lichtenstein Hartbees" |
5.3.20 Hippo (Hippopotamus amphibius)
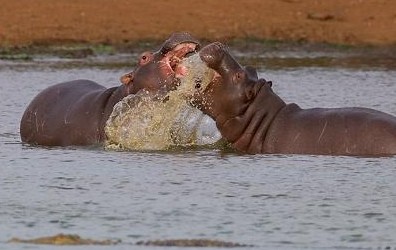
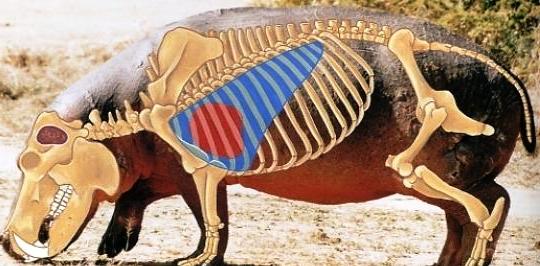
    Average Mass:   2000
    Temperament: Caution to nervous
    Average Shoulder Height:    150 cm (60")
    Rowland Ward:   75.89 cm (29 7/9")
    SCI:    50 Points
    Track: 254mm (10 ") x 254mm (10 ")
    Equipment: 1000gr @ 205fps, Ro<5
|  |
| Further Reading: Fritz Rabe, AB&A, Mar 2009, p17 |
5.3.21 Hyaena (Crocuta crocuta)
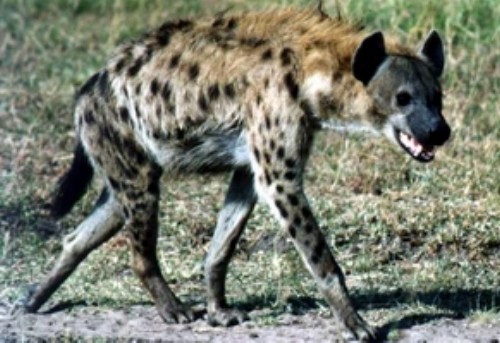
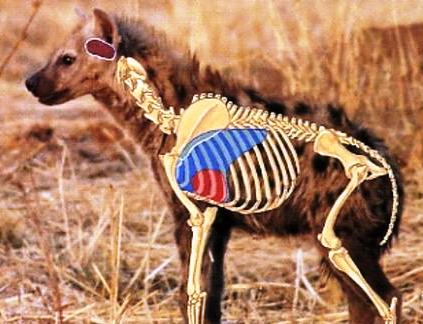
    Average Mass:   70
    Temperament: Reasonably calm
    Average Shoulder Height:    80 cm (31")
    Rowland Ward: -----
    SCI:    15 Points
    Track: 110mm (4") x 110mm (4")
    Equipment: 350gr @ 250fps, Ro<12
|  |
| Further Reading: Cleve Cheney, AB&A, Sep 2009, p8, "Hunting Hyena" |
5.3.22 Impala/Rooibok (Aepyceros melampus melampus)
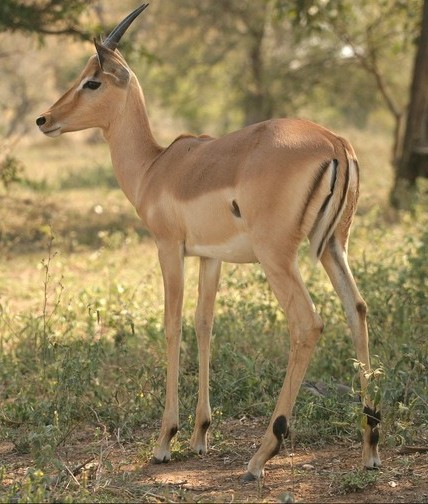
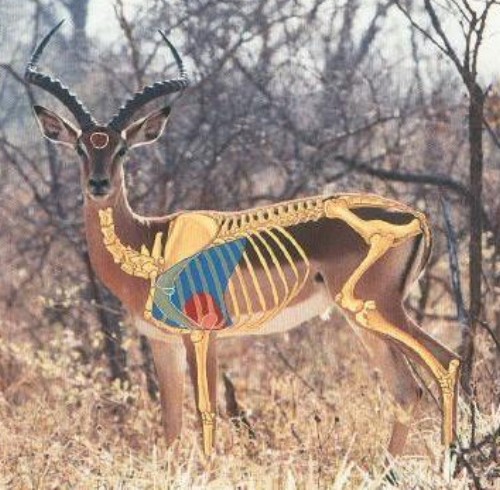
    Average Mass:   39-80, 58, 22-46
    Temperament: Cautious
    Average Shoulder Height:    90 cm (36")
    Rowland Ward:   60.02 cm (23 5/8")
    SCI:    54 Points
    Track: 60mm (2 3/8") x 41mm (1 5/8")
    Equipment: 350gr @ 275fps, Ro<12
| |
| Further Reading: Cleve Cheney, AB, Nov/Dec 2000, p8, "Bowhunting the Impala" Cleve Cheney, AB&A, Jul 2007, p8, "Hunting Impala" Eddie Muller, AB&A, Jul 2007, p19, "Impala Hunt at Elandskloof" Gerhard Delport, AB&A, Mar 2009, p34 |
5.3.23 Jackals
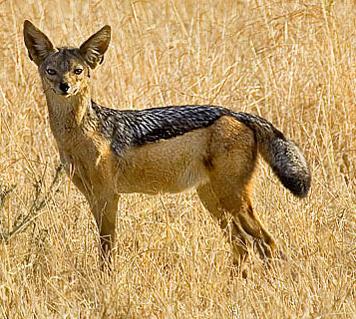
    Average Mass:   4 - 8kg
    Temperament: Cautious
    Average Shoulder Height:    30 cm (12")
    Rowland Ward:
    SCI:
    Track:
    Equipment: 350gr @ 250fps, Ro<12
|
| Further Reading: Cleve Cheney, AB&A, Apr 2007, p6, "Hunting Black Back Jackal" |
5.3.24 Klipspringer (Oreotragus oreotragus)
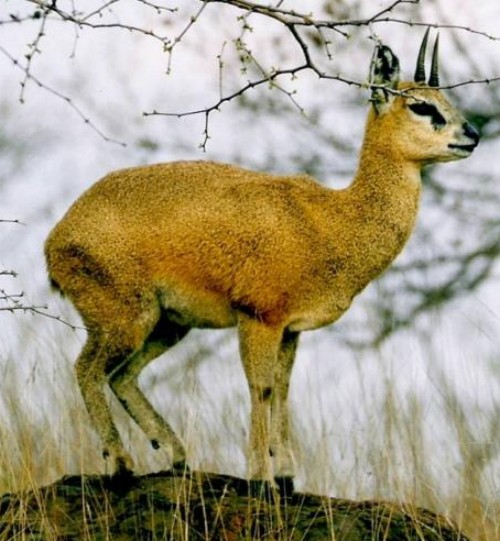
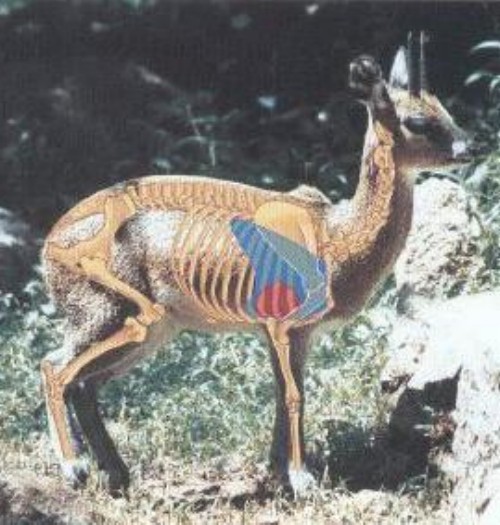
    Average Mass:   11-16, 55, 6-9
    Average Shoulder Height:    53 cm (21")
    Rowland Ward:   10.49 cm (4 1/8 ")
    SCI:    11 Points
    Track: 22mm (7/8") x 13mm (1/2")
    Equipment: 350gr @ 250fps, Ro<12
|  |
5.3.25 Kudu (Tragelaphus strepsiceros strepsiceros)
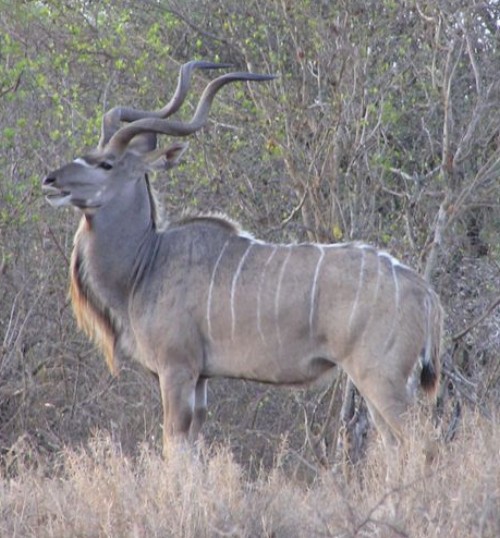

    Average Mass:   150-300, 57, 86-172
    Temperament: Cautious
    Average Shoulder Height:    150 cm (59")
    Rowland Ward:   136.85 cm (53 7/8 ")
    SCI:    121 Points
    Track: 111mm (4 3/8") x 51mm (2")
    Equipment: 500gr @ 250fps, Ro<10
| 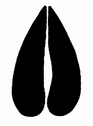 |
| Further Reading: Cleve Cheney, AB&A, Sep 2006, p8, "Hunting Kudu" |
5.3.26 Leopard (Panthera pardus)


    Average Mass:   82
    Temperament: Reasonably calm
    Average Shoulder Height:    71 cm (28")
    Rowland Ward:   39.06 cm (15 3/8")
    SCI:    14 Points
    Track:108mm (4 1/4") x 108mm (4 1/4")
    Equipment: 500gr @ 250fps, Ro<12
| |
5.3.27 Lion (Panthera leo)
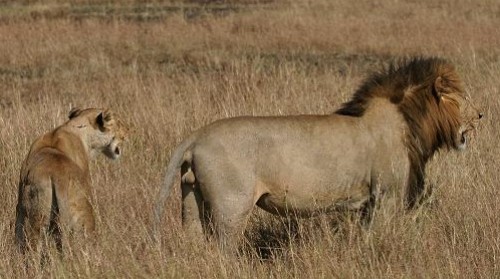
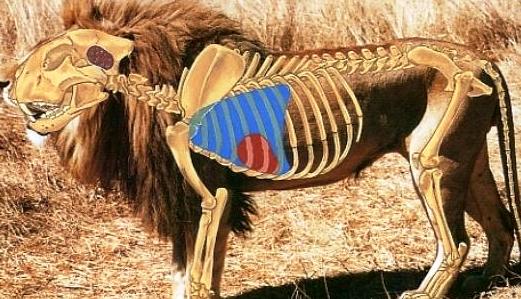
    Average Mass:   210
    Temperament: Reasonably calm
    Average Shoulder Height:    106 cm (42")
    Rowland Ward:   60.96 cm (24 ")
    SCI:    23 Points
    Track: 146mm (5 3/4") x 127mm (5")
    Equipment: 500gr @ 250fps, Ro<12
| 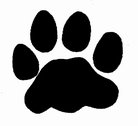 |
| Further Reading: George Tsaparis, AB, Jan/Feb 2001, p22, "Lion Hunt" Smit Craill, AB&A, Feb 2008, p50, "Om 'n leeu met 'n boog te jag" |
5.3.28 Nyala (Tragelaphus angasii)


    Average Mass:   90-136, 55, 50-75
    Temperament: Cautious
    Average Shoulder Height:    112 cm (44")
    Rowland Ward:   68.58 cm (27")
    SCI:    63 Points
    Track: 60mm (2 3/8") x 41mm (1 5/8 ")
    Equipment: 450gr @ 250fps, Ro<12
| 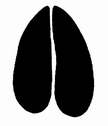 |
5.3.29 Oribi (Ourebia ourebia)
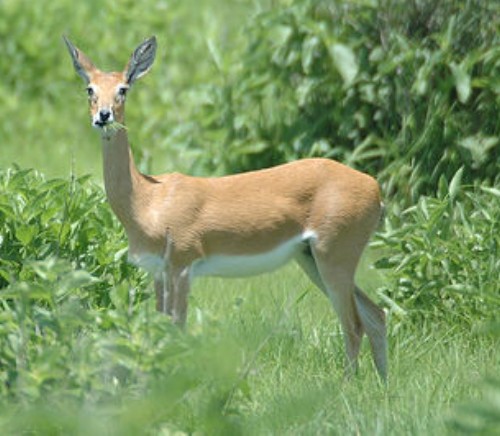
    Average Mass:   14-20, 55, 8-11
    Temperament:
    Average Shoulder Height:    58 cm (23")
    Rowland Ward:   14.93 cm (5 7/8 ")
    SCI:    13 Points
    Track: 35mm (1 3/8") x 19mm (3/4")
    Equipment: 350gr @ 250fps, Ro<12
| 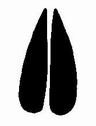 |
5.3.30 Ostrich (Stuthio camelus)
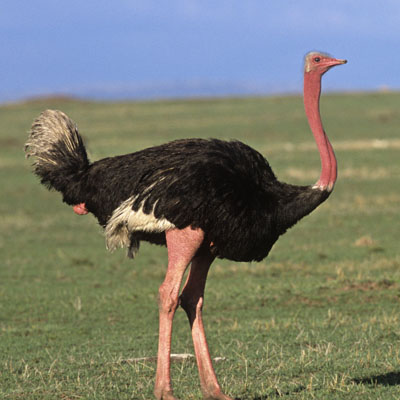
    Average Mass:
    Temperament:
    Average Shoulder Height:
    Rowland Ward:
    SCI:
    Track:
    Equipment: 400gr @ 250fps, Ro<12
|
| Further Reading: Cleve Cheney, AB&A, Feb 2008, p8, "Hunting Ostrich" |
5.3.31 Porcupine ()

    Average Mass:   10-24kg
    Temperament:
    Average Shoulder Height:    10 - 15 cm (6")
    Rowland Ward:
    SCI:
    Track:
    Equipment: 350gr @ 250fps, Ro<12
| Further Reading: Cleve Cheney, AB&A, Jan 2008, p8, "Hunting Porcupine" |
5.3.32 Puku (Kobus vardonii)
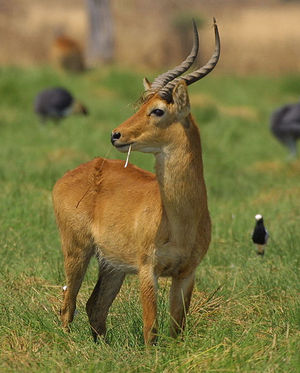
    Average Mass:   62-74kg
    Temperament:
    Average Shoulder Height:    80 cm (31")
    Record:   56,2 cm
    SCI:
    Track:
    Equipment: 450gr @ 250fps, Ro<12
| Further Reading: Cleve Cheney, AB&A, Jul 2006, p8, "Hunting the Puku" |
5.3.33 Reedbuck (Redunca arundinum)
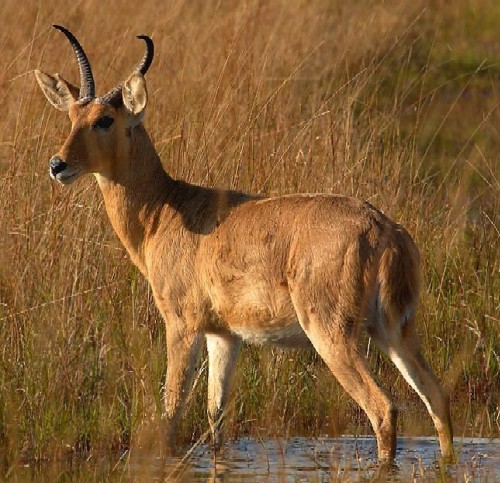
    Average Mass:   50-80, 55, 28-44
    Temperament: nervous
    Average Shoulder Height:    91.44 cm (36")
    Rowland Ward:   35.56 cm (14")
    SCI:    21 Points
    Track: 64mm (2 1/2") x 41mm (1 5/8")
    Equipment: 450gr @ 250fps, Ro<12
| |
5.3.34 Rhino (Ceratotherium simum simum)
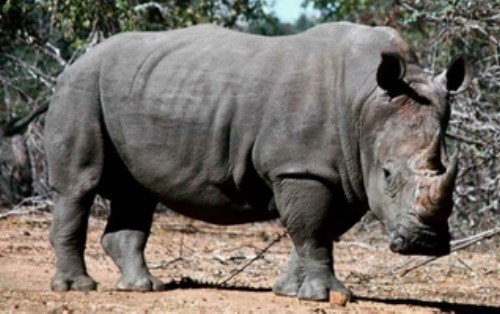

    Average Mass:   2150
    Temperament:
    White: Reasonably calm; Black: nervous
    Average Shoulder Height: 170cm (67")
    Rowland Ward:  71.12cm (28")
    SCI:   70 Points
    Track: 279mm (11") x 229mm (9")
    Equipment: 1200gr @ 200fps, Ro<5
|  |
| Further Reading: Cleve Cheney, AB&A, Apr 2006, p8, "Hunting White Rhino" |
5.3.35 Roan Antelope / Bastergemsbok (Hippotragus equinus equinus)
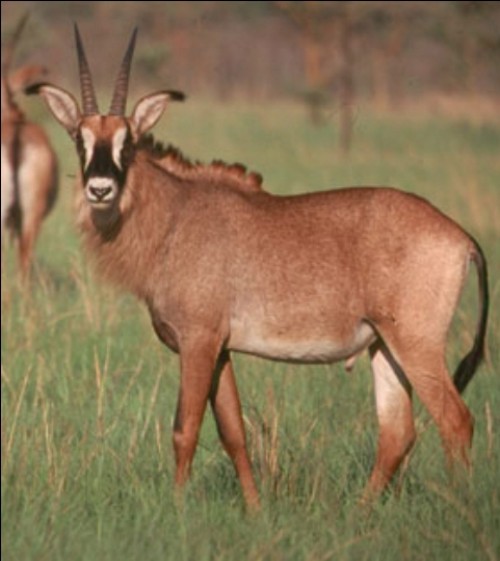
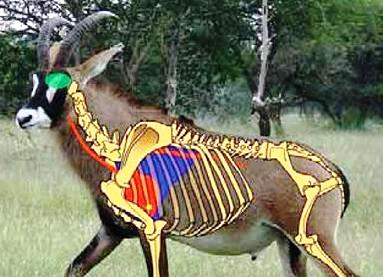
    Average Mass:   227-272, 55, 125-150
    Temperament: Cautious
    Average Shoulder Height:    143 cm (56")
    Rowland Ward:   68.58 cm (27")
    SCI:    68 Points
    Track: 121mm (4 3/4") x 89mm (3 1/2")
    Equipment: 600gr @ 250fps, Ro<10
| |
| Further Reading: Cleve Cheney, AB&A, Jan 2009, p8 |
5.3.36 Sable (Hippotragus niger niger)
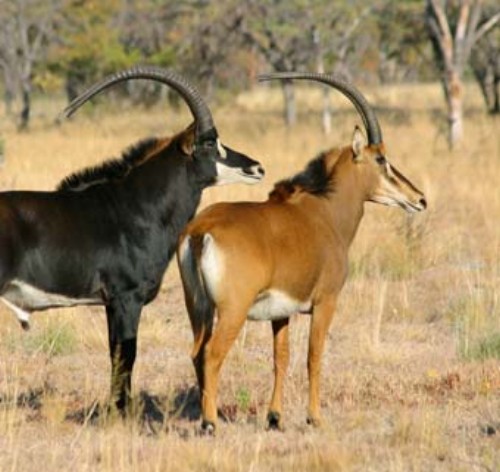

    Average Mass:   180-230, 55, 100-127
    Temperament: Cautious
    Average Shoulder Height:    140 cm (55")
    Rowland Ward:   106.37 cm (41 7/8 ")
    SCI:    100 Points
    Track: 114mm (4 1/2") x 76mm (3")
    Equipment: 600gr @ 250fps, Ro<10
| |
| Further Reading: Cleve Cheney, AB&A, Nov 2007, p8, "Hunting Sable" Carl Hager, AB&A, Nov 2007, p13, "Fable of a Sable" |
5.3.37 Sitatunga / Waterkoedoe (Tragelaphus spekei)
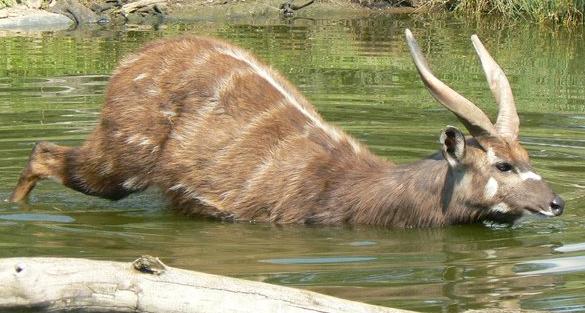
    Average Mass:   55-115kg
    Temperament:
    Average Shoulder Height:    75-125 cm (29")
    Record:   92.4 cm
    SCI:
    Track:
    Equipment: 400gr @ 250fps, Ro<12
| Further Reading: Cleve Cheney, AB&A, Jun 2007, p8, "Hunting Sitatunga" |
5.3.38 Soenie/Suni (Neotragus moschatus)
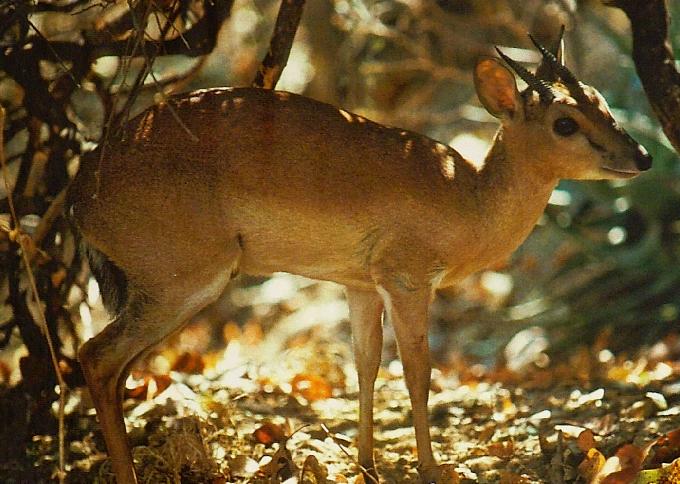
    Average Mass:   5kg
    Temperament:
    Average Shoulder Height:    35 cm (14")
    Rowland Ward:
    SCI:
    Track:
    Equipment: 350gr @ 250fps, Ro<12
| Further Reading: Cleve Cheney, AB&A, Oct 2006, p8, "Hunting Suni" |
5.3.39 Springbuck (Antidorcas marsupialis)
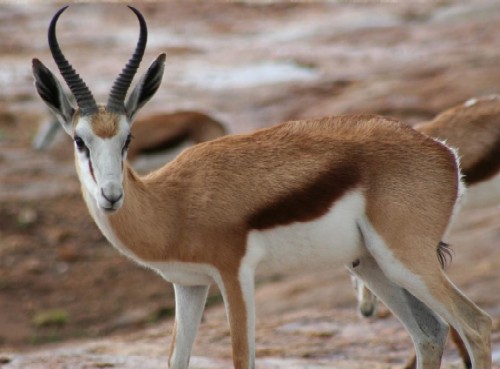
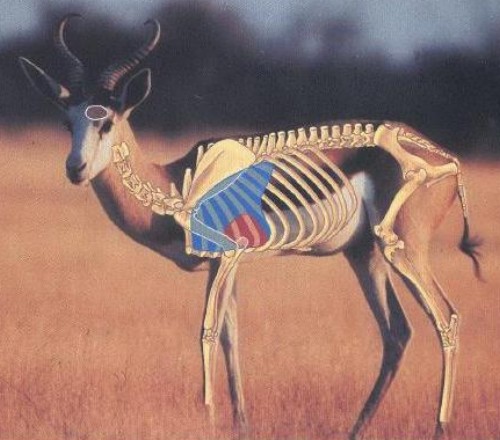
    Average Mass:   33-48, 51-58, 18-26
    Temperament: nervous
    Average Shoulder Height:    74 cm (29")
    Rowland Ward:   35.56 cm (14")
    SCI:    30 Points
    Track: 51mm (2") x 35mm (1 3/8")
    Equipment: 350gr @ 275fps, Ro<12
| |
| Further Reading: Cleve Cheney, AB&A, May 2008, p8, "Hunting Springbuck" Frank Berbuir, AB&A, May 2008, p27, "Springbuck with bow and arrow" |
5.3.40 Steenbok (Raphicerus campestris)
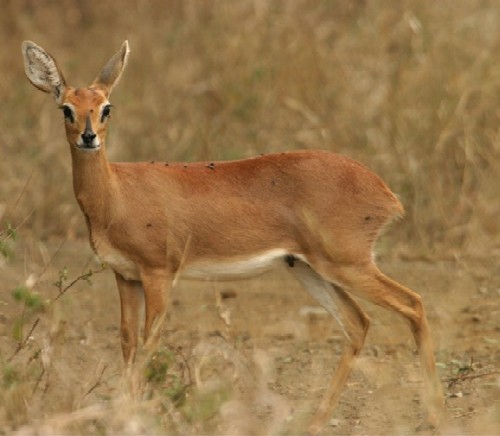
    Average Mass:   9-14, 55, 5-8
    Temperament: Cautious
    Average Shoulder Height:    52 cm (20")
    Rowland Ward:   11.43 cm (4 1/2")
    SCI:    11 Points
    Track: 32mm (1 1/4") x 19mm (1 3/4")
    Equipment: 350gr @ 250fps, Ro<12
|  |
5.3.41 Tsessebe (also Topi)(Damaliscus lunatus lunatus)
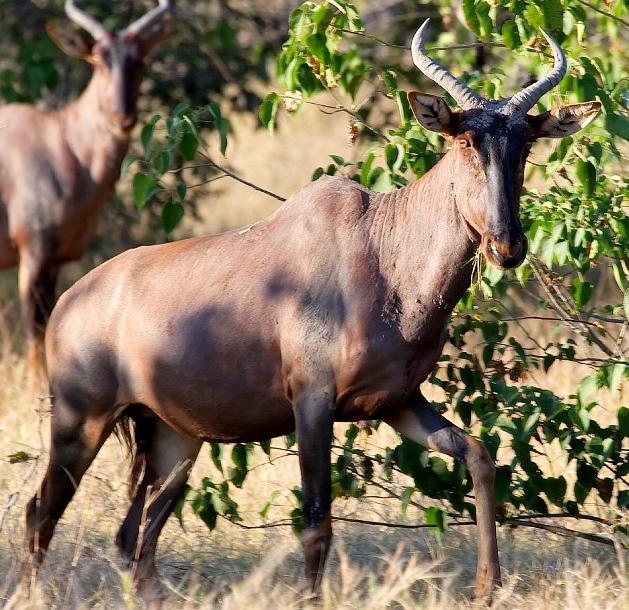
    Average Mass:   126 - 140 kg
    Temperament: Cautious
    Average Shoulder Height:    120 cm (47")
    Record:  46.99 cm
    SCI:
    Track:
    Equipment: 450gr @ 250fps, Ro<12
|
| Further Reading: Cleve Cheney, AB&A, Mar 2009, p8 |
5.3.42 Warthog (Phacochoerus africanus)

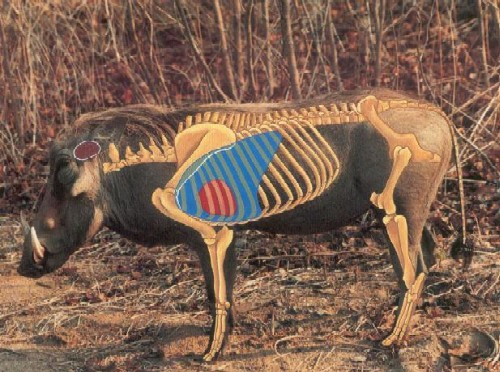
    Average Mass:   80
    Temperament: Cautious
    Average Shoulder Height:    70 cm (28")
    Rowland Ward:   33.02 cm (13")
    SCI:    30 Points
    Track: 51mm (2") x 44mm (1 3/4")
    Equipment: 450gr @ 250fps, Ro<12
| |
5.3.43 Waterbuck (Kobus ellipsiprymnus)
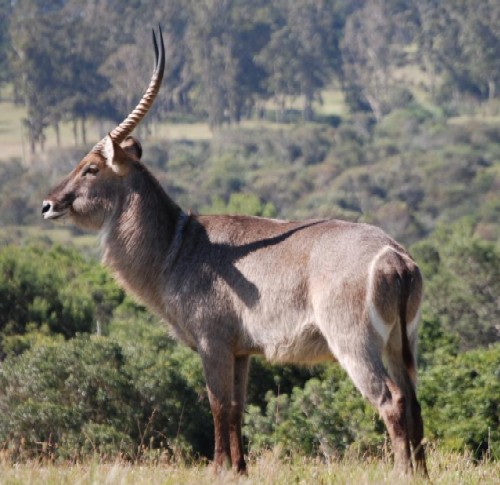
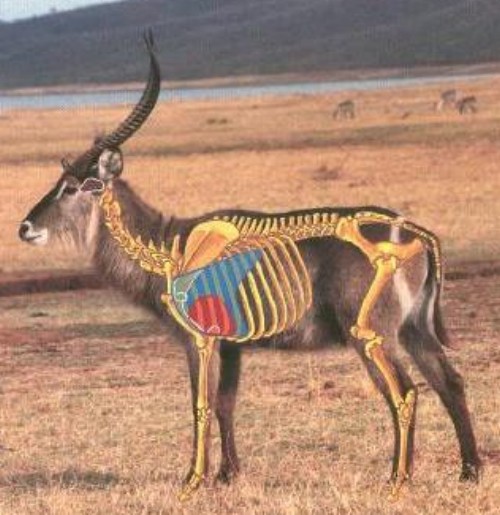
    Average Mass:   240-270, 55, 112-150
    Temperament: Cautious
    Average Shoulder Height:    127 cm (50")
    Rowland Ward:   71.12 cm (28")
    SCI:    70 Points
    Track: 51mm (2") x 44mm (1 3/4")
    Equipment: 500gr @ 250fps, Ro<10
| |
| Further Reading: Cleve Cheney, AB&A, Oct 2007, p8, "Hunting Waterbuck" Adrian De Villiers, AB&A, Oct 2007, p13, "Defassa Waterbuck" |
5.3.44 Wild Boar (Sus scrofa barbarus)
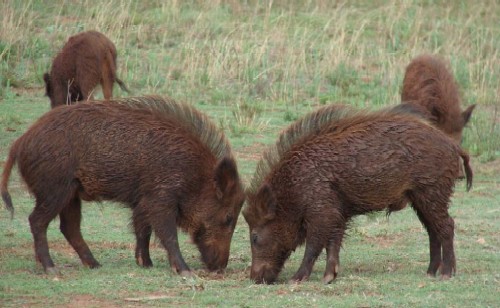
Note: many boar has a grizzle pad, | |
| Further Reading: Engee Potgieter, AB&A, Dec 2007, p13, "An Eurasian Wild Boar Hunt" |
5.3.45 Zebra (Equus quagga antiquorum)
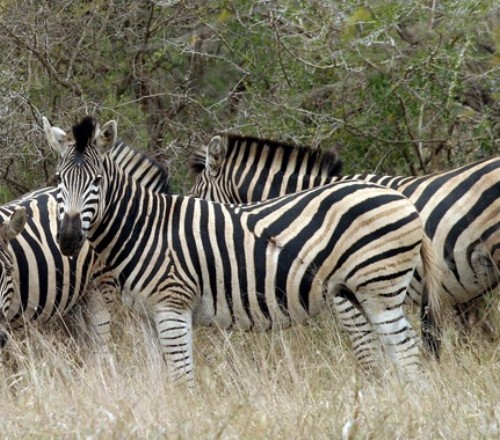
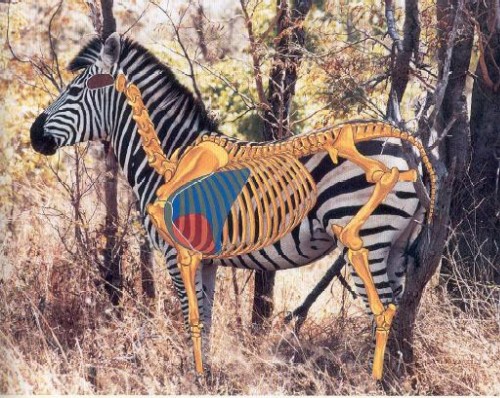
    Average Mass:   270-350, 55, 150-200
    Temperament: Reasonably calm
    Average Shoulder Height:    130 cm (51")
    Track: 127mm (5") x 102mm (4")
    Equipment: 500gr @ 250fps, Ro<8
| 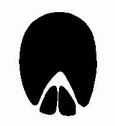 |
| Further Reading: Cleve Cheney, AB&A, Apr 2008, p8, "Hunting Burchell's Zebra" Cleve Cheney, AB&A, Sep 2009, p46, "Tracking Zebra" Cleve Cheney, AB&A, Aug 2006, p8, "Hunting the Hartman's Zebra" |
5.4 Gender Recognition Using Horns
|
| Further Reading: Fritz Rabe, AB&A, Dec 2008, p25, "The Tiny Ten" Fritz Rabe, AB&A, Sep/Oct/Nov 2008, p17, "Dangerous Game" |
5.5 Synopsis on legislation in other Southern African Countries
5.5.1 Namibia
Namibia have a recent legislation on Bowhunting, all antelopes can be hunted with bow and arrow. The guide must have a special permit to accompany bow hunters. Just as RSA, Namibia has chosen the arrows kinetic energy as a rule for the various sizes of game. (we expanded it to include mass and velocity) |
Category : Small antelopes ex. Blesbuck mass(gr) : 300 velocity(fps) : 200 Kinetic Energy : 25 momentum% : 27 Category : Midsize antelopes ex. Kudu, Warthog mass(gr) : 350 velocity(fps) : 230 Kinetic Energy : 40 momentum% : 36 Category : Large antelopes ex. Eland, Gemsbok mass(gr) : 500 velocity(fps) : 235 Kinetic Energy : 60 momentum% : 52 |
5.5.2 Botswana
In 1995 was the first modern bow hunts allowed. Hunting with bow and arrow is only allowed on plains game. Minimum (400gr@240fps) 50FtLbs 68 Joule for the following game: Bushbuck, Duiker, Reedbuck, Red Lechwe, Impala, Oribi, Wildebeest, Zebra, Tsessebe, Kudu, Sable, Hartebeest, Gemsbok. |
5.5.3 Zimbabwe
In Zimbabwe Bowhunting has been legal with special regulation since 1989. The legislation has recently been changed and from 1999 according to Park and Wildlife General Amendment Regulation no 3 i.e. Bowhunting is allowed on "Alienated land" i.e. private and federal land excluding the concessions bordering the Zambezi or other areas were a concession is in effect. |
5.5.4 Some American Guidelines
Small Game (rabbit, groundhog, etc.) mass(gr) : 300 velocity(fps) : 200 Kinetic Energy : 25 Momentum% : 27 Medium Game (deer, antelope, etc.) mass(gr) : 350 velocity(fps) : 230 Kinetic Energy : 40 Momentum% : 36 Large Game (elk, black bear, wild boar, etc.) mass(gr) : 500 velocity(fps) : 240 Kinetic Energy : 65 Momentum% : 53 Toughest Game (Grizzly, etc.) mass(gr) : 500 velocity(fps) : 240 Kinetic Energy : 65 Momentum% : 53 |
6 Assessing the Bowhunter's proficiency
6.1 Bowhunting Education and Certification Objectives
The objectives of this book are:
|
6.2 General suggestions on the certification process
The Assessor should ideally make use of a projector and notebook/laptop computer, since there are numerous colour pictures. The questionnaire should also be printed in colour, unless it can be projected. |
    1) Theoretical presentation
    2) Discussion and Q&A on all aspects
    3) Theoretical test
    4) Practical Shot Placement test

In order to do the certification, the hunter requires the following:
   * A bow, and at least 3 arrows with broadheads
   * A rangefinder (optional)
   * A pen and calculator
   * A ID photograph
   * Practical assessment will be done in full hunting gear.
|
The test is on the theoretical discussion, and is an "open book" test. Each hunter should be encouraged to make their own decisions, but discussion during the test is not prohibited. The objectives of this phase are to educate firstly, and then test the hunter on: |
    1) Identification of species
    2) Compensating for angled shots
    3) Assessment of the temperament of the animal
    4) Identification of Gender
    5) Assessment of ethical situation
    6) Shot Placement
    7) Evaluation of hunting equipment re suitability
    8) Calculating maximum ethical hunting distances
    9) Showing general knowledge on bowhunting technique and practice
|
Each objective is to be scored separately. The tests are to be marked by collecting all the papers, and then randomly distributing them among all the participants. The marking is then done as a group effort, with full discussion of all answers. 6.3 Suggestions for Practical shooting assessment
7 Bibliography |
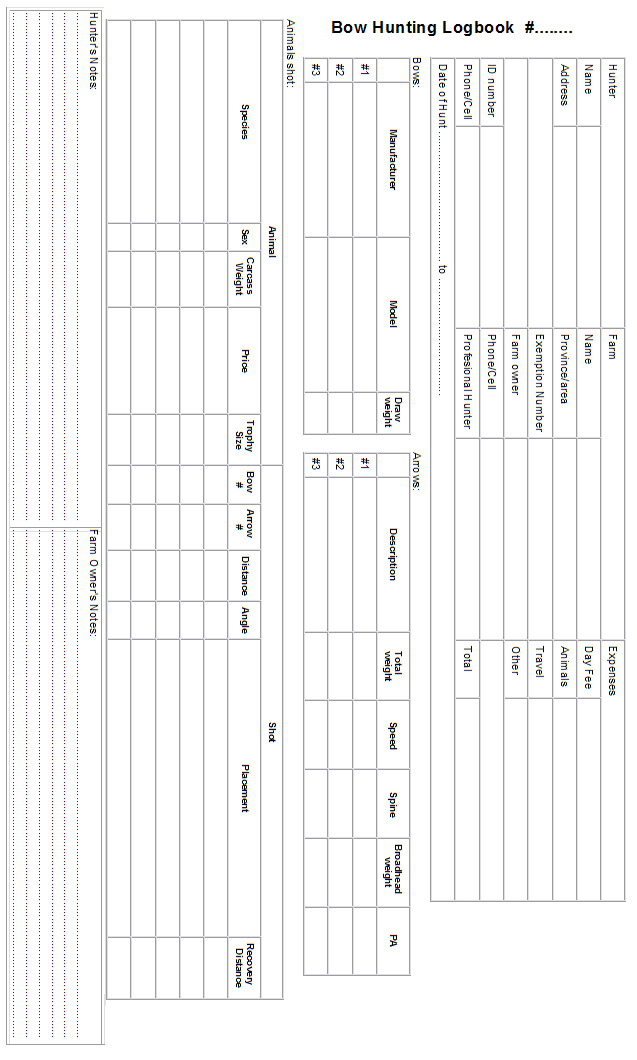
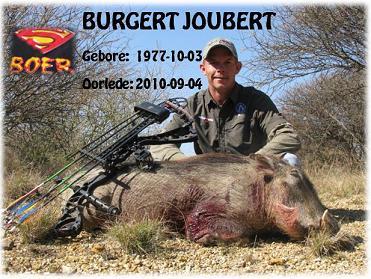
)
)
)
)
)